

This post shows how to create a Grails tag library for adding and removing identical HTML blocks, which can be used when you want to give the user an option to dynamically add extra inputs for additional information. There are lots of simple JQuery and pure JavaScript solutions for this feature, but, in general, they are not flexible and clean enough for a Grails application. A pure tag library approach helps avoid HTML and JS clutter in a GSP file and speeds up development, since all you need to do is specify the tag with the necessary parameters.
This tag eventually should render the following HTML elements:
- HTML blocks to dynamically add and remove (hereinafter called items)
- remove the button next to each item
- add button to add new items
Let’s get to the tag library implementation. Assume that you want to allow users to dynamically add inputs to a form that contains information about customers (text fields for the first and last name, and a checkbox for the “account expired” option), and the form may have from 2 to 5 customers. Then the GSP file may look like this:
<g:form controller="customer" action="saveInfo">
  <dynamic:block itemId="customerInfo" min="2" max="5"
                 limitReachedMsg="Sorry, you cannot specify more than 5 customers"
                 removeBtnLabel="Delete">
    <!-- the block of inputs we want to add and remove (firstName, lastName and isExpired) -->
    <g:textField name="firstName"/>
    <g:textField name="lastName"/>
    <g:checkBox name="isExpired"/>
  </dynamic:block>
  <g:submitButton name="submit" value="Submit"/>
</g:form>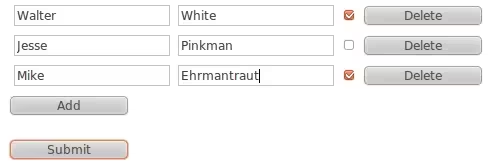
And the dynamic tag library should consist of the following .groovy, .gsp, and .js files:
- DynamicBlocksTagLib.groovy – tag library with the
dynamic:blocktag which accepts and processes the necessary parameters and renders a GSP template with HTML elements and JS code - _add.gsp – the GSP template rendered by the
dynamic:blocktag that provides supporting HTML elements, such
as the add button and item counter - dynamicBlocks.js – JavaScript functions for adding/removing the items
Tag library (DynamicBlocksTagLib.groovy)
Here is a list of the features we want the dynamic:block tag to support:
| itemId – will be used as an ID prefix for dynamically added items and as an ID suffix for “supporting” HTML elements, such as the add button, item counter, etc. | Parameter | Mandatory |
| allow to use a few different dynamic:block tags on the same page | itemId – will be used as an id prefix for dynamically added items and as an id suffix for “supporting” HTML elements, such as the add button, item counter, etc. | required |
| create new item from either tag’s body or separate GSP template | template – the name of the GSP template; if missing, the tag’s body will be used instead | optional |
| model – the model passed to the GSP template | optional | |
| use custom add button | addBtnId – if missing, a default add button will be rendered | optional |
| limit the minimum and maximum number of items on the page | min – the number of items that will be added automatically when the page loads (their remove buttons will be disabled) | optional |
| max – the maximum number of items that can be added by user | optional | |
| limitReachedMsg – the message that will be displayed if the limit is reached | optional | |
| accept custom label for remove buttons | removeBtnLabel – defaults to “Remove” | optional |
| execute the JS callback function for the newly added item | onComplete – the name of a JS function to call; functions like this must accept the item index number as a parameter | optional |
Eventually, the tag should do the following:
- check that the itemId parameter exists
- validate the max and min parameters (should be integer numbers, the min must be less than the max)
- prepare the template for new items
- render GSP template (_add.gsp)
Now, let’s get to the code:
class DynamicBlocksTagLib {

  /**
   * Tag library namespace.
   */
  static namespace = "dynamic"

  /**
   * Renders the template that allows to dynamically add and remove identical HTML blocks
   * (hereinafter "items").
   *
   * @attr itemId          REQUIRED The prefix for the item id (every item id consists of
   *                                the prefix and the index number)
   * @attr template        OPTIONAL The name of a GSP template that contains HTML code for
   *                                every item (if missing, the tag's body will be used)
   * @attr model           OPTIONAL The model passed to the GSP template
   * @attr addBtnId        OPTIONAL The id of the 'add' button, the page must contain
   *                                an element with this id to provide custom 'add' button;
   *                                if isn't specified, the default 'add' button
   *                                will be rendered
   * @attr removeBtnLabel  OPTIONAL The label of the 'remove' button that is rendered
   *                                for each item (defaults to 'Remove')
   * @attr min             OPTIONAL The minimum number of items (the number of items that are
   *                                rendered by default)
   * @attr max             OPTIONAL The maximum number of items that can be added to the page
   * @attr limitReachedMsg OPTIONAL The message displayed when the limit is reached
   * @attr onComplete      OPTIONAL The name of a JS function that will be executed right
   *                                after a new item is added (must accept
   *                                the item index number)
   */
  def block = { attrs, body ->
    // checks if the itemId attribute is passed to the tag
    def id = attrs.itemId
    if (!id) throwTagError("[id] attribute must be specified")

    // validates the min and max attributes
    def min
    def max
    try {
      min = attrs.min ? attrs.min as int : null
      max = attrs.max ? attrs.max as int : null
    } catch (NumberFormatException nfe) {
      throwTagError("[min] and [max] attributes must be integer numbers")
    }
    if (min && max && max < min) {
      throwTagError("[min] attribute must be less than [max]")
    }

    // prepares template for new items
    def elem = attrs.template ? render(template: attrs.template, model: attrs.model) : body()
    elem = elem.replaceAll('\n', '') // makes the template single-lined in order to pass it
                                     // as a parameter to JS function that adds new items
    elem = elem.encodeAsJavaScript() // makes the template able to pass into a JS function

    // renders GSP template with auxiliary HTML and JS code
    out << render(template: "/partials/dynamicBlocks/add", model: [
        id: id,
        elem: elem,
        addBtnId: attrs.addBtnId,
        removeBtnLabel: attrs.removeBtnLabel,
        min: min ?: 0,
        max: max ?: 0,
        limitReachedMsg: attrs.limitReachedMsg,
        onComplete: attrs.onComplete
    ])
  }
}GSP template rendered by the tag library (_add.gsp)
Let’s consider what “supporting” elements should be placed in the GSP template that is rendered by our tag library:
- the element that wraps all dynamically added items
- the item counter that keeps the total number of items added; every time a user adds a new item, the counter is increased, and its value is appended to the ID of the new item
- the add button and JavaScript that binds the “click” event handler to it
- JavaScript that renders the initial number of items specified by the min attribute
As it was mentioned before, since we should be able to place several dynamic:block tags on the same page, we need to append itemId as a suffix to the ids of the additional elements: item counter, wrapper, and add button.
This way, the template _add.gsp should look like the following:
<div id="count_${id}" style="display: none;">0</div>
<div id="parent_${id}"></div>
<g:if test="${!addBtnId}">
  <input id="add_${id}" type="button" value="Add"/>
</g:if>

<r:script>
  function initializeTag(addButton, id, elem, min, max, onComplete, limitReachedMsg,
                         removeBtnLabel) {
    // binds event handler to the "click" JS event of the "Add" button
    addButton.click(function() {
      addItem(id, elem, min, max, onComplete, limitReachedMsg, removeBtnLabel);
    });

    // adds the initial number of items
    for (var i = 0; i < min; i++) {
      addButton.click();
    }
  }

  $(function () {
    // gets the "Add" button
    var addButton = ${addBtnId ? "\$('#$addBtnId')" : "\$('#add_$id')"};

    // imports the dynamicBlocks.js file if it has not been imported yet
    if (!window["addItem"]) {
      $.getScript("${resource(dir: "js", file: "dynamicBlocks.js")}", function() {
        initializeTag(addButton, "${id}", "${elem}", ${min}, ${max}, "${onComplete}",
          "${limitReachedMsg}", "${removeBtnLabel}");
      });
    } else {
      initializeTag(addButton, "${id}", "${elem}", ${min}, ${max}, "${onComplete}",
        "${limitReachedMsg}", "${removeBtnLabel}");
    }
  });
</r:script>JavaScript functions (dynamicBlocks.js)
To make the above code work, we need to implement the addItem function. This function will be responsible for adding new items to the page. Also, we need to add an index number to every HTML element inside the item template to avoid ID duplication and to keep the ability to access the elements via the ID HTML attribute:
/*
 * Adds a new item.
 */
function addItem(id, elem, min, max, onComplete, limitMessage, removeBtnLabel) {
  // checks if we have reached maximum number of elements
  if (!max || $('[id^=' + id + ']').length < max) {
    // increments the item counter
    var $countElem = $('#count_' + id);
    var num = parseInt($countElem.html()) + 1;
    $countElem.html(num);
    // creates new item and adds the index number to it
    var $newElem = $('<div></div>').html(elem).attr({'id' : id + num}).css('margin', '5px');
    // creates the "Remove" button
    var $removeButton = $('<input type="button"/>').appendTo($newElem);
    $removeButton.attr({
      id: 'remove_' + id,
      value: removeBtnLabel ? removeBtnLabel : 'Remove',
      disabled: 'disabled'
    });
    // binds handler to the 'click' JS event of the "Remove" button
    $removeButton.click(function() {
      removeItem(id, num, min);
    });
    // changes IDs of all elements inside new item
    indexItem($newElem, num);
    // appends new item to the parent element
    $('#parent_' + id).append($newElem);
    // enables "Remove" buttons if there are more than minimum number of elements on the page
    if ($('[id^=' + id + ']').length > min) {
      $('[id^=remove_' + id + ']').removeAttr('disabled');
    }
    // executes the 'onComplete' JS function if it exists
    if (window[onComplete] instanceof Function) {
      window[onComplete](num);
    }
  } else {
    // displays a message if the maximum limit is reached
    alert(limitMessage ? limitMessage : 'You cannot add more elements.');
  }
}

/*
 * Removes an item.
 */
function removeItem(id, num, min) {
  $('#' + id + num).remove();
  if ($('[id^=' + id + ']').length <= min) {
    $('[id^=remove_' + id + ']').attr('disabled', 'disabled');
  }
}

/*
 * Changes ID of every item's child by adding the index number to it.
 */
function indexItem($elem, num) {
  $elem.children().each(function() {
    var nodeId = $(this).attr('id');
    if (nodeId) {
      $(this).attr('id', nodeId + num);
    }
    indexItem($(this), num);
  });
}Now let’s add the newly created tag to a GSP file and try out how it works:
<dynamic:block itemId="fullName" min="1" max="3">
  <g:textField name="firstName"/>
  <g:textField name="lastName"/>
</dynamic:block>The resulting HTML should look like the following:
<div id="count_fullName" style="display: none;">2</div>
<div id="parent_fullName">
  <div id="fullName1">
    <input type="text" name="firstName" id="firstName1" value=""/>
    <input type="text" name="lastName" id="lastName1" value=""/>
    <input type="button" id="remove_fullName1" value="Remove"/>
  </div>
  <div id="fullName2">
    <input type="text" name="firstName" id="firstName2" value=""/>
    <input type="text" name="lastName" id="lastName2" value=""/>
    <input type="button" id="remove_fullName2" value="Remove"/>
  </div>
</div>
<input id="add_fullName" type="button" value="Add"/>
<script type="text/javascript">
  function initializeTag(addButton, id, elem, min, max, onComplete, limitReachedMsg,
                         removeBtnLabel) {
    addButton.click(function() {
      addItem(id, elem, min, max, onComplete, limitReachedMsg, removeBtnLabel);
    });

    for (var i = 0; i < min; i++) {
      addButton.click();
    }
  }

  $(function () {
    var addButton = $('#add_fullName');

    if (!window['addItem']) {
      $.getScript("/static/js/dynamicBlocks.js", function() {
        initializeTag(addButton, 'fullName', '<input type=\"text\" name=\"firstName\" value=\"\" id=\"firstName\" \/><input type=\"text\" name=\"lastName\" value=\"\" id=\"lastName\" \/>',
          1, 3, '', '', '');
      });
    } else {
      initializeTag(addButton, 'fullName', '<input type=\"text\" name=\"firstName\" value=\"\" id=\"firstName\" \/><input type=\"text\" name=\"lastName\" value=\"\" id=\"lastName\" \/>',
        1, 3, '', '', '');
    }
  });
</script>Saving values of dynamically added checkboxes and radio inputs
At this point, our tag library works fine, and we’re able to dynamically add/remove form elements and receive data from them. But what will happen if we place a checkbox in the dynamic:block tag’s body? Let’s assume there is a checkbox named expired in the tag’s body. And you have added 3 items to the form and checked the 2nd and the 3rd ones. After the form is submitted, you’ll see that some checkboxes are selected in the params.expired array in your controller:
[on, on]But you do not know which particular ones they are, as you have three elements with the same name. One way to fix this is to use the g:checkBox tag, which adds a hidden field before the checkbox (this hidden field has the same name as the checkbox, but with an underscore prefix), and, after adding a new item, update the checkbox and hidden field for this item by adding a point (‘.’) and an index number to their names. This will result in the following expired map in received parameters:
[_1:, _2:, _3:, 1:on, 3:on]So now we are able to parse it in the controller and transform it into an array:
params.expired = params.expired.inject([]) { res, entry ->
  entry.key.startsWith('_') ? (res + [params.expired[entry.key.replace('_', '')]]) : res
}[on, null, on]Another issue may occur with radio inputs. For instance, if you add a group of two radio inputs inside the tag’s body and click the add button twice, you will have four radio inputs on the form, but be able to check only one of them at a time. That’s because they all have the same name. Apparently, we must add an index number to the radio input names inside each newly added item. As a result, we will receive one parameter per radio group:
[radioGroup2:yellow, radioGroup3:yellow, radioGroup1:blue, radioGroup4:blue]These parameters can be easily transformed into an array:
params.radioGroup = params
  .findAll { it.key.startsWith('radioGroup') }
  .sort    { it.key }
.collect { it.value }[blue, yellow, yellow, blue]Lastly, a JS function that changes the names of the radio inputs and checkboxes may look like the following:
function indexCheckableInputs($elem, num) {
  $elem.find('input[type=radio]').each(function() {
    $(this).attr('name', $(this).attr('name') + num);
  });
  $elem.find('input[type=checkbox]').each(function() {
    $(this).prev().attr('name', $(this).prev().attr('name') + '.' + num);
    $(this).attr('name', $(this).attr('name') + '.' + num);
  });
}

function addItem(/* ... */) {
  // ...
  indexItem($newElem, num);
  indexCheckableInputs($newElem, num);
  // ...
}You can download the tag library here.


