

Creating your first React, Express, and Apollo (GraphQL) application can be a serious challenge, and while there are tools like Create Apollo App that simplify the generation of a boilerplate project with these technologies, it’s best to have a clear understanding of how such an application can be built.
We show how to develop a modular application with the MongoDB, Express, React, Node.js (MERN) stack that uses Apollo, a popular GraphQL implementation for JavaScript applications.
You can have a look at the implemented application in this repository:
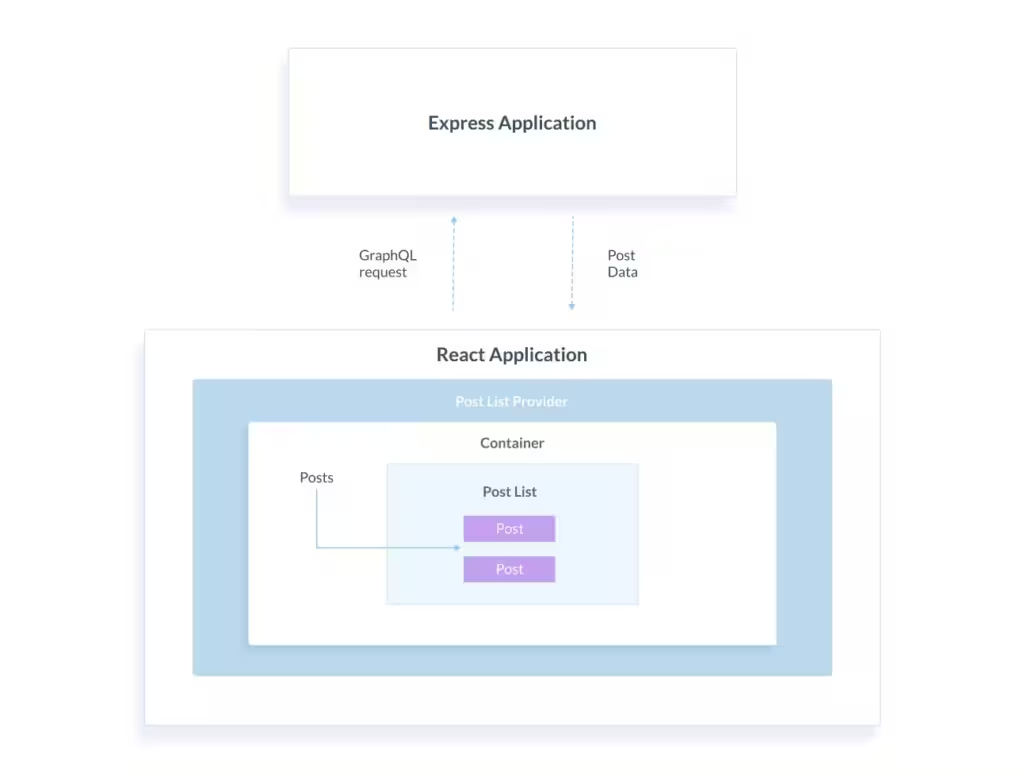
Before we dive deep into the implementation details, we want to give a bird’s-eye view of what this MERN application, powered by Apollo, will look like.
An Overview of the Apollo, React, and Express Application
We’re going to build an application that fetches posts from the backend API, sends them to that API to save into the database, and displays them to the user.
This application will consist of:
- An Express server application that uses Apollo Server;
- A database powered with MongoDB and Mongoose;
- A React client application that uses Apollo Client; and
- A Post module on both client and server.
Throughout the project, we install and handle the dependencies with Yarn, but you can use NPM as well. We also recommend using the latest stable version of Node.js, although any version starting from Node.js 6 will work.
We assume that you already have a basic understanding of React, Express, MongoDB, and GraphQL. And even if you’re not familiar with these technologies, with the detailed explanation we give on each code snippet, you’ll be able to grasp how the application works.
Besides the MERN stack and Apollo, we use Reactstrap components such as Container, Button, Form, FormControl, and others for generic HTML layouts with Bootstrap styles.
Next, let’s review the project structure.
Express, React, and Apollo Application Structure
Most tutorials provide a simplified structure for Express, React, and Apollo applications with the idea to focus on the implementation rather than how the project looks. However, we’re going to show a modular approach to bring this application closer to real-world projects.
Here’s what our React and Express application looks like:
apollo-app
├── client                     # The client package
│   └── src                    # All the source files of the React app
│       ├── config             # The React application settings
│       ├── modules            # The client-side modules
│       ├── App.js             # The React application's main component
│       ├── index.html         # React application template
│       └── index.js           # React application entry point
├── node_modules               # Global Node.js modules
├── server                     # The server package
│   ├── config                 # The Express application configurations
│   ├── modules                # Server modules
│   └── server.js              # The Express application's entry point
├── package.json               # Project metadata and packages
└── webpack.config.js # Webpack configuration for ReactThe application will have two separate directories — server and client — to store the server and client files, respectively. This structure also has a single package.json file, which will contain all the dependencies. In a real-world application, however, we recommend that you completely separate the client from the server so they have their own dependencies and package.json files. We don’t do that for simplicity.
We start off by installing MongoDB. After that, we add an Express server application that uses Apollo Server to handle incoming GraphQL queries. In the last section, we review the React application that uses Apollo Client and react-apollo to send GraphQL queries.
Installing MongoDB
You can skip over to creating the application if you already have MongoDB up and running. If not, run the following commands one by one.
Note that we install MongoDB on Ubuntu 18.04, and you need to consult the official MongoDB documentation for the other installation options:
# #1 Import the public key used by the package management system
sudo apt-key adv --keyserver hkp://keyserver.ubuntu.com:80 --recv 9DA31620334BD75D9DCB49F368818C72E52529D4

# #2 Add a list file for MongoDB
echo "deb [ arch=amd64 ] https://repo.mongodb.org/apt/ubuntu bionic/mongodb-org/4.0 multiverse" | sudo tee /etc/apt/sources.list.d/mongodb-org-4.0.list

# #3 Reload local package database
sudo apt-get update

# #4 Install MongoDB
sudo apt-get install -y mongodb-orgOnce the installation is complete, you can check if the MongoDB server is up and running:
# Verify the status of MongoDB server
sudo systemctl status mongodYou should see a message similar to this: Active: active (running) since Tue 2019-01-08 08:33:00 EET; 51min ago. However, if you see the message Active: inactive (dead). Then, you need to run one of the commands below:
# Restart MongoDB
sudo service mongod restart

# Or always start MongoDB on the system startup
sudo systemctl enable mongodThe first command restarts the MongoDB server, while the second command configures the Ubuntu system manager to always run MongoDB on the system startup.
We can move on to developing the Express application with Apollo Server.
Initializing an Express, React, and Apollo Application
Initialize a new project by running the commands below:
# #1 Make a new folder for the project
mkdir apollo-app

# #2 Go into the project
cd apollo-app

# #3 Initialize a new project
# Use --yes to generate a default package.json
yarn init --yesYou get a directory apollo-app (or whatever you named it) and a package.json file with some default project metadata. (Our choice for the project name is dictated by the application design: This application uses Apollo with GraphQL instead of the traditional RESTful approach.)
In the next section, we’re building an Express application with Apollo Server.
Creating an Express Application with Apollo Server
The Express application you’re going to build has the following structure:
apollo-app
├── server                              # The server package
    ├── config                          # The Express application configurations
        └── database.js                 # Mongoose configurations
    ├── modules                         # Server modules
        └── post                        # Post module
            ├── models                  # Mongoose models for Post module
               └── post.model.js        # Mongoose model
            ├── graphqlSchema.js        # GraphQL types and mutations
            └── resolvers.js            # GraphQL resolver functions
└── server.js # The Express application entry pointThe server.js is an entry point for this Express application; in this file, an Express app and Apollo Server are initialized. The config folder will contain all the Express application configurations. For example, the mongoose configurations will be stored in server/config/database.js.
The server application also has the modules folder to store all Express modules. In this app, there’s just one module, Post, which will have a model, a GraphQL schema created with Apollo Server, and resolvers to handle GraphQL queries. Similarly, you can add other server modules under modules with their own models, GraphQL schemas, and resolvers.
Let’s build an Express server application with this structure.
Installing Dependencies for an Express Server
Run the following command to add the server directory under the root apollo-app:
# Make sure you are in the apollo-app root folder
mkdir serverThat’ll allocate a space for an Express server application. It’s time to install a few dependencies — Express, Apollo, GraphQL, and MongoDB.
Run the following two commands in succession to install all the Express dependencies that the application needs:
# #1 Install the basic Express application dependencies
yarn add express apollo-server-express graphql mongoose

# #2 Install nodemon to development dependencies
yarn add nodemon --devLet’s clarify what all these packages are used for. Naturally, express creates an Express server application. To build a GraphQL schema and resolvers with Apollo Server, apollo-server-express must be installed with graphql. Finally, you need to install mongoose, a package that connects to and can query a MongoDB database.
With the second command, you install nodemon, an optional package, which is great in that it simplifies your work with Express applications — nodemon automatically rebuilds and re-runs the app whenever you change the code.
Creating a Script to Run an Express App
Provided that you installed nodemon, you can add the following script to the package.json file:
{
  "scripts": {
    "server": "nodemon ./server/server.js"
  }
}Otherwise, the script might look like this: "server": "node ./server/server.js".
Next, we create server.js.
Creating an Entry Point for an Express Server Application
Create server.js under the server folder and add the basic code below:
// #1 Import Express and Apollo Server
const express = require('express');
const { ApolloServer } = require('apollo-server-express');

// #2 Import mongoose
const mongoose = require('./config/database');

// #3 Import GraphQL type definitions
const typeDefs = require('./modules/post/graphqlSchema');

// #4 Import GraphQL resolvers
const resolvers = require('./modules/post/resolvers');

// #5 Initialize an Apollo server
const server = new ApolloServer({ typeDefs, resolvers });

// #6 Initialize an Express application
const app = express();

// #7 Use the Express application as middleware in Apollo server
server.applyMiddleware({ app });

// #8 Set the port that the Express application will listen to
app.listen({ port: 3000 }, () => {
  console.log(`Server running on https://localhost:${port}${server.graphqlPath}`);
});Let’s explain what’s happening in the code snippet.
First, we import express and apollo-server-express to be able to create an Express application and an instance of Apollo Server, respectively. We also import a mongoose instance from the config/database.js file to connect to MongoDB — the file doesn’t exist yet, but we’ll show it soon.
Next, we import the Apollo type definitions and resolvers — typeDefs and resolvers. They’re the two key components necessary for Apollo and GraphQL to work. We also show these components in the later sections.
After importing the dependencies, we create an instance of Apollo Server and pass it the typeDefs and resolvers. An Apollo server will then be able to handle GraphQL queries coming from the client application and use suitable GraphQL types and resolvers.
Notice that the Express application must be passed as middleware to the Apollo server. That’s necessary so that once Apollo handles GraphQL queries, it can cede control to Express.
Finally, we set the application port and log out a message when the Express application is running.
You might run the Express server right now, but the console will yell with errors: a mongoose instance, type definitions, and resolvers don’t exist. So let’s create them.
Creating a Mongoose Instance
To connect to MongoDB, you first need to configure mongoose. The database configs will be kept in a dedicated folderserver/config. Create database.js with the following code under server/config:
// The file server/config/database.js
// #1 Import mongoose
const mongoose = require('mongoose');

// #2 Create a query string to connect to MongoDB server
const DB_URI = 'mongodb://localhost:27017/graphql-app';

// #3 Connect to MongoDB
mongoose.connect(DB_URI, { useNewUrlParser: true });

// #4 Add basic event listeners on the mongoose.connection object
mongoose.connection.once('open', () => console.log('Connected to a MongoDB instance'));
mongoose.connection.on('error', error => console.error(error));

// #5 Export mongoose. You’ll use it in server/server.js file
module.exports = mongoose;In the code above, we first require mongoose and create a sort of default URI mongodb://localhost:27017/apollo-app to connect to the apollo-app database in MongoDB. There’s no need to manually create this database: MongoDB will do this automatically once the first query will be sent by Mongoose. You can choose any name for the database; we decided to name it apollo-app, the same as the project.
After requiring mongoose and creating a URI, the Express application connects to the database by calling the mongoose.connect() method. You must pass DB_URI as the first argument to connect(). Also, pass the second argument { useNewUrlParser: true } to enable Mongoose’s URL parser. This argument is necessary to remove the warning DeprecationWarning: current URL string parser is deprecated, which may be produced with the latest Mongoose versions.
We also add a couple of event listeners for the open and error events on the mongoose.connection object and log out a couple of messages. You can understand the connecton object as just a database that the Express application connects to.
If you decide to run the Express app, it’ll be able to connect to MongoDB using the mongoose instance: recall the line const mongoose = require('./config/database'); in server.js.
The Post Module We Create Next. Creating a Module for the Express Server
Because this Express application has a modular structure, you need to add a new folder modules under server to keep all the backend modules in one place. Each module should be stored in its own folder, for example modules/auth for authentication or modules/user for the user module.
We can now add a mongoose model, GraphQL schema, and resolvers.
Creating a mongoose model for MongoDB
With Mongoose, creating a model to query MongoDB for data is easy. First, a mongoose schema needs to be described to specify the fields that each new object must have. After that, a model is created by the model() method, and this model will be used to query the database.
We suggest that you store all models under server/modules/{module}/models directories. For this reason, the Post module will have its models under server/modules/post/models.
Here’s the code for a simple mongoose schema and model:
// #1 Import the constructor Schema and the model() method
// Note the use of ES6 desctructuring
const { Schema, model }  = require('mongoose');

// #2 Instantiate a schema using mongoose Schema
const postSchema = new Schema({
  title: String,
  content: String
});

// #3 Create a model with mongoose model() method
const Post = model('post', postSchema);

module.exports = Post;As you can see, a Mongoose Schema class is used with an object parameter. In the case of posts, the object parameter sets the two fields — title and content — both types of String.
To create a new model, it’s enough to call the mongoose model() method passing in a model name as the first argument and a schema as the second argument. The model name must be singular and lowercase letters: 'post'. Mongoose, however, will create the posts collection (note the plural form) in the apollo-app database.
There are no resolvers with a GraphQL schema. Let’s build them.
Creating a GraphQL schema on the Express server
Let’s first recap how GraphQL works. GraphQL needs a schema to understand how to retrieve and save data. Don’t confuse a GraphQL schema and a mongoose schema, though! These are two different objects that serve different purposes.
You can think of a GraphQL schema as an object that contains the descriptions of the types, queries, and mutations:
- Types define the shape for data that the server and client send back and forth.
- Queries define how the Express server must respond to the client’s GET requests.
- Mutations determine how the new data is created or updated.
With the obvious stuff out of the way, we can switch to creating a GraphQL schema for the Post module using Apollo.
Add a new file graphqlSchema.js under the server/modules/post folder. Add the following code to the file:
// #1 Import the gql method from apollo-server-express
const { gql } = require('apollo-server-express');

// #2 Construct a schema with gql and using the GraphQL schema language
const typeDefs = gql`
// #3 Define the respective type with three fields
// Note that the _id is created automatically by mongoose
  type Post {
    _id: ID,
    title: String,
    content: String
  },
  #4 Define the query type that must respond to 'posts' query
  type Query {
    posts: [Post]
  },
  #5 Define a mutation to add new posts with two required fields
  type Mutation {
    addPost(title: String!, content: String!): Post,
  }
`;

module.exports = typeDefs;To create type definitions, Apollo’s gql method is used.
First, in the schema description, we create the type Post to tell GraphQL that we’ll be passing around post objects. Each post will have three fields — an ID, a title, and a content. Each object field must have its own type, and so we used an ID type for _id and a String type for title and content.
Second, this GraphQL schema contains a query type. In terms of the RESTful design, you can understand type Query as an endpoint GET for a URL https://my-website.com/posts. Basically, with type Query { posts: [Post] } we say, “Our Express server will be able to accept GET requests on posts, and it must return an array of posts on those GraphQL requests.”
Our GraphQL schema also has a mutation addPost() to save user posts. This mutation specifies that it needs the frontend application to send a new title and content in the query.
You might have noticed that the mutation doesn’t use the _id field, but you don’t have to create this field on the frontend as MongoDB automatically generates an ID for each document you insert into a database, and that ID will be sent from the server to the client.
It’s time to create the second part of the parameter object, resolvers, which must be passed to ApolloServer to process the queries and mutations described in this schema.
Implementing GraphQL resolvers with Apollo
A GraphQL schema with queries and mutations doesn’t really do anything other than outline what data types are available and how to respond to different HTTP requests. To actually handle the client requests, Apollo Server needs resolvers, which are just functions that retrieve or mutate the requested data.
Our module needs another file to store its resolvers, resolvers.js, which you can add next to typeDefs.js under the server/modules/post directory.
The code snippet below has two groups of resolvers, Query and Mutation. Also, notice the imported mongoose model you’ve already created, which is necessary to work with posts that are stored in MongoDB:
// #1 Import the model created with mongoose
const Post = require('./models/post');

// #2 Create resolver functions to handle GraphQL queries
/**
 * Query resolver "posts" must return values in response to
 * the query "posts" in GraphQL schema.
 */
const resolvers = {
  Query: {
    // Query which returns posts list
    posts: () => Post.find({}),
  },

/**
 * Mutation resolver addPost creates a new document in MongoDB
 * in response to the "addPost" mutation in GraphQL schema.
 * The mutation resolvers must return the created object.
 */
  Mutation: {
    addPost: (parent, post) => {
      // Create a new record in the database
      const newPost = new Post({ title: post.title, content: post.content });
      // Save the record and return it
      return newPost.save();
    }
  }
};

module.exports = resolvers;Let’s focus on the resolvers.
First, you create an object with two fields — Query and Mutation. When you want to respond back to the client using Apollo, you need to specify the Query property with one or several resolvers for all the query types listed in a GraphQL schema. In our application, Query needs only one resolver posts() to respond to the query posts defined in ./post/graphqlSchema.js. posts() will then request MongoDB for posts using the Post model’s find() method, which is available on all mongoose models.
Similarly, when you’re saving a new post with Apollo, you need to add a dedicated addPost() resolver to the Mutation property. The resolver accepts two parameters (in fact, it can accept up to four parameters according to Apollo documentation, but we don’t need all of them for our example).
The first parameter in addPost(), called parent, refers to the parent resolver when you have nested resolvers. This parameter isn’t used for this mutation. The second parameter is the data sent by the client application, and this data can be passed to a mongoose model when instantiating new objects: new Post({title: post.title, content: post.content}).
Pay attention to the code inside addPost(). Just instantiating a new document with a mongoose model doesn’t save it to the database, and you have to additionally call the model method save() on the newly created object. Also, remember to return the object in the mutation resolver so that Express sends it back to the client (save() returns a new document after saving it to MongoDB).
Let’s recap what you’ve created so far:
- A very simple Express application
- An instance of Apollo Server to handle GraphQL on the server
- A connection to a MongoDB instance with mongoose
- A Post module with a model, GraphQL schema, queries, mutations, and resolvers
This is what the console output should produce when you now run the Express application with yarn server:
$ yarn server
yarn run v1.13.0
$ nodemon server/server.js
[nodemon] 1.18.9
[nodemon] to restart at any time, enter `rs`
[nodemon] watching: *.*
[nodemon] starting `node server/server.js`
Server is running on https://localhost:3000/graphql
Connected to MongoDBIt’s time to start building a React application that will connect to the Express server using Apollo Client.
Creating a Client Application with React and Apollo Client
To store the React application, you need to create the client/src folder under the root:
# apollo-app root folder
mkdir client
cd client
mkdir srcWe again start with a discussion over the modular structure for the React application. You can skip the next section and
start building the application React, though.
React and Modular Architecture
In most cases, we build React applications this way: We create an entry point index.js, a root component App, and a components folder to store all kinds of React components. But the client application in this guide will have a different structure reflecting the modular approach we used for our Express server application:
graphql-app
├── client                                  # The frontend package
    └── src                                 # All the source files of the React app
        ├── modules                         # The React modules
            ├── user                        # The User module
            └── auth                        # The Authentication module
        ├── config                          # React application configurations
            └── createApolloClient.js       # An Apollo Client instance
        ├── App.js                          # The React application root component
        ├── index.html                      # The React application HTML layout
└── index.js # The entry point for React applicationThe React application will have the modules folder with individual folders for each module such as User and Auth. Additionally, the folder with all modules must contain an index.js file that exports them:
// modules/index.js
export { Posts } from './post';
export { User } from './user';
export { Auth } from './auth';You can then import all the modules into App.js and add them to the root component to be rendered.
Recalling that life isn’t all beer and skittles, we make this structure even more complex by creating several folders in each module to keep module files grouped by their purpose.
This is what each module in our React application looks like:
modules
├── some-module
    ├── components
    ├── containers
    ├── providers
    ├── styles
└── index.jsLet’s clarify what’s what in a React module:
componentscontain separate module components. Their only purpose is to render parts of the module. In our application,componentswill store thePostListandPostFormReact components.containershave one or several files with module containers in which we add module components. In our React app, there’s just one containerindex.js.providerscontain wrappers for components. Components shouldn’t query the server; instead, they should delegate this responsibility to providers. Recall the Separation of Concerns design principle, and it’ll become clear why we use providers.stylescontain.cssfiles with module-specific styles.index.jsexports the entire module.
Although this approach of creating a complicated modular structure may seem useless and mind-blowing for a small React application, it’ll bear fruit when your application grows larger. It’s a good idea to have a good structure from the very beginning of application development.
You can now focus on creating the React application.
Installing React, Apollo, and Webpack Dependencies
You need to install quite a few dependencies to be able to run our React app.
For starters, since our app builds will be created with webpack, install the webpack dependencies along with loaders and plugins to development dependencies (devDependencies in package.json).
# Run from the root
yarn add webpack webpack-cli webpack-dev-server --devThe webpack and webpack-cli are the basic dependencies necessary to build bundles with webpack, and webpack-dev-server is necessary to serve the frontend applications.
Now install these dependencies:
yarn add html-webpack-plugin css-loader style-loader babel-loader --devWith html-webpack-plugin, you can automate the creation of the index.html root layout for the React application; this plugin automatically adds the index.js entry point to the script tag in the layout. The React application also needs two loaders to handle CSS — style-loader and css-loader.
babel-loader, which transpiles React code to valid JavaScript, requires two additional Babel dependencies to work
— @babel/core and babel/preset-react. And since we’ll be using class decorators for React components, the @babel/plugin-proposal-decorators is also necessary (we’ll explain what these decorators do later in the article when we have a look at the Post module components).
Install the following three dependencies:
yarn add @babel/core @babel/preset-react @babel/plugin-proposal-decorators --devYou can now install React:
yarn add react react-domFinally, to be able to use GraphQL with React, another three dependencies are required — apollo-boost, react-apollo, and graphql (you’ve already installed graphql for the server application, so there’s no need to install it again):
yarn add apollo-boost react-apolloapollo-boost is an all-in-one package provided by Apollo to let you build GraphQL queries and mutations on the client. React needs react-apollo, a library that provides custom GraphQL components, in particular, ApolloProvider, Query, and Mutation. These GraphQL components will be necessary to wrap the React layout components, yielding them the data retrieved from the server by Apollo.
We’re also going to use a UI toolkit, Reactstrap, to quickly create Bootstrap components with generic styles. Reactstrap is optional, but without it, you’ll have to manually create the layout for React components. It’s your call.
Since Reactstrap can’t work without Bootstrap, you need to install these two dependencies:
yarn add reactstrap bootstrapThat’s it. All the dependencies for the React application are in place. Before we actually start creating our React app, let’s also add a script to be able to run it:
{
  "scripts": {
    "client": "webpack-dev-server --mode development --open"
  }
}This script will run webpack-dev-server in development mode. And once the client build is ready, your default browser will automatically open the page: notice the --open option.
Don’t try to run the React application now, as errors will ensue. You need to first configure Webpack for React, then create a few basic files.
Configuring Webpack for React
Create webpack.config.js under the project’s root folder and add the code below. There aren’t many configurations, as we intentionally keep the webpack configuration minimal:
const HtmlWebPackPlugin = require('html-webpack-plugin');

const htmlPlugin = new HtmlWebPackPlugin({
  template: './client/src/index.html'
});

module.exports = {
  entry: './client/src/index.js',
  module: {
    rules: [
      {
        test: /\.js$/,
        exclude: /node_modules/,
        use: {
          loader: 'babel-loader',
          options: {
            presets: ['@babel/preset-react'],
            plugins: [
              ["@babel/plugin-proposal-decorators", { "legacy": true }],
            ]
          }
        }
      },
      {
        test: /\.css$/,
        use: ['style-loader', 'css-loader']
      }
    ]
  },
  plugins: [htmlPlugin]
};This Webpack configuration is typical for React applications.
Webpack needs the entry file where the application starts and the module.rules property to know how to handle
different files. All the .js files will be processed with the babel-loader and @babel/preset-react. Additionally,
we set the plugins property to use @babel/plugin-proposal-decorators and {'legacy': true}, which are the default Babel settings for decorators. Notice that HTMLWebpackPlugin must be passed to the plugins array so that Webpack knows what HTML file to load with the build script.
The webpack configuration is done. It’s time to work on our React application.
Creating Basic Files for the React Application
You can finally move on to building a React application.
Create the client/src folder under the project root if you haven’t done this already. Inside src, create the other two folders: config and modules.
Next, you need to create the following key files for React:
index.html, a basic HTML templateindex.js, the entry pointApp.js, the root React componentsettings/createApolloClient.js, an instance of Apollo Client with configurations
Let’s create the listed files.
Add the following HTML code to client/src/index.html:
<!DOCTYPE html>
<html lang="en">

  <head>
    <meta charset="UTF-8">
    <meta name="viewport" content="width=device-width, initial-scale=1.0">
    <meta http-equiv="X-UA-Compatible" content="ie=edge">
    <title>An Apollo, React, and Express Example Application</title>
  </head>

  <body>
    <div id="root"></div>
  </body>

</html>Note that there’s no script tag that adds the React app to the page — HtmlWebpackPlugin adds it for you automatically.
Create the entry point for the application — the client/src/index.js file. Add the following code to bootstrap the React application:
import React from 'react'
import ReactDOM from 'react-dom';

import App from './App';

import 'bootstrap/dist/css/bootstrap.min.css';

ReactDOM.render(<App />, document.getElementById('root'));This code is typical for any React application: You import the root App component, two required React dependencies, and Bootstrap. Finally, you render App into the div#root HTML element (found in index.html).
Creating the Main React App Component
You might have already created root App components for your React applications with the RESTful approach, so you know what a typical root component looks like in React. In this application, however, App must be wrapped into another component, which is provided by react-apollo, to make it possible to use Apollo Client with React.
Take a look at App.js:
import React, { Component } from 'react'
import { ApolloProvider } from 'react-apollo';
import apolloClient from './settings/createApolloClient';
import { Posts } from './modules';

class App extends Component {
  render() {
    return (
      <ApolloProvider client={apolloClient}>
        <Posts />
      </ApolloProvider>
    )
  }
}

export default App;As you can see, besides the basic React dependencies — React and Component, the file imports ApolloProvider, an instance of Apollo Client, and the module we’re going to build.
ApolloProvider from react-apollo is a root component to wrap an entire React application, and it needs an instance of Apollo Client to work: <ApolloProvider client={apolloClient}>. An Apollo Client instance will tell the application how to query the server.
Now, we need to create an Apollo Client instance.
Initializing Apollo Client
Under client/src/config, create createApolloClient.js with the following code:
import ApolloClient from 'apollo-boost';

const client = new ApolloClient({
  uri: 'https://localhost:3000/graphql'
});

export default client;There’s nothing special going on in this file, but this code is vital for the React app to use Apollo Client. First, we import the ApolloClient constructor from apollo-boost. Then, when instantiating an Apollo client, we pass an object parameter with Apollo settings. For this application, only the URL is necessary so that Apollo knows where to send GraphQL queries. You may run the Express application now and see the logged line Server is running on https://localhost:3000/graphql, the same URL.
Creating a React Module
Under client/src/modules, create a new root directory post with four sub-directories — components, containers, providers, and styles. Finally, add index.js with the following code under the module root:
export { default as Posts } from './containers';This file simply imports the main container from ./containers.
Next, create an index.js under post/containers and copy and paste the code below into it:
import React, { Component } from 'react'

import { withPosts } from '../providers';
import { PostList, PostForm } from '../components';

import { Container, Row, Col } from 'reactstrap';
import '../styles/styles.css';

/**
 * Wrap a component using the withPosts provider
 * to get data retrieved with GraphQL.
 */
@withPosts
export default class PostRoot extends Component {
  render() {
    const { posts, postsLoading } = this.props;

    return (
      <Container>
        <h2 className="posts-title">Posts Module</h2>
            <hr />
        <Row>
          <Col>
            <PostList postsLoading={postsLoading} posts={posts} />
          </Col>
          <Col>
            <PostForm />
          </Col>
        </Row>
      </Container>
    )
  }
}Let’s clarify how this code works.
containers/index.js provides the root React component for the Post module and is called PostRoot. Besides importing React and Component, we also imported the main provider withPosts (which we show later). withPosts wraps PostRoot and provides the data received from the Express server to the PostList component.
Note the syntax: before the class definition goes @withPosts as a decorator, and for this exact functionality, you installed @babel/plugin-proposal-decorators before.
Instead of using a decorator, you’d have to write code like this:
//…
class PostRoot extends Component { //… }

export default withPosts(PostRoot);As you can see, using decorators makes it possible to use a bit shorter syntax.
Let’s now discuss the layout in this container. As you noticed, we imported Container, Row, and Col components from Reactstrap. Each Reactstrap component is an HTML layout with default Bootstrap classes. Therefore, the following two layouts are identical:
<!-- Container layout built of Reactstrap components -->
<Container>
    <h2 className="title">Module</h2>
    <hr />
    <Row>
      <Col>
        <List />
      </Col>
      <Col>
        <Form />
      </Col>
    </Row>
</Container>

<!-- An identical layout built of HTML elements with Bootstrap classes -->
<div className="container">
    <h2 className="title">Module</h2>
    <hr />
    <div className="row">
      <div className="col">
        <!-- Custom List component -->
      </div>
      <div className="col">
        <!-- Custom Form component -->
       </div>
    </div>
</div>Reactstrap makes building React layouts with Bootstrap styles simpler than if you’d write basic HTML with Bootstrap classes manually.
There’s one more thing to do before you can create providers and components for the current module. For convenience, it’s best to have index.js files under each module sub-folder to exports multiple providers or components.
Create an index.js file under post/providers and add another index.js into post/components.
This is what the providers/index.js file should look like:
export { default as withPosts } from './PostList';
export { default as withAddPost } from './AddPost';And this how components/index.js looks:
export { default as PostList } from './PostList';
export { default as PostForm } from './PostForm';Thanks to these exports, you can shorten the import statements in your files. For instance, instead of importing a specific component with a line import { withPosts } from '../providers/withPosts'; you can write a simpler line import { withPosts } from '../providers';. This way, you can also import multiple components in a single line.
Now you can focus on creating the application components and providers. First, we talk through creating the Post List, and after that, we’ll show the Post Form.
Creating a Post List
The Post List will be responsible for two things: retrieving posts from the server and rendering them. Hence, you need to create two separate React components to handle those two functions.
One component — dumb component — will only render the list; this component will be stored in components/PostList.js. Another component follows the Higher Order Component (HOC) pattern and uses Apollo to query the server and pass data as props to the dumb component. This HOC will be stored in providers/PostList.js.
Creating a PostList Higher Order Component
For a recap, HOC is a pattern in React development that lets you reuse the same logic for many components. In simple terms, an HOC is a React component that does something and then passes the results of calculations as a props object into a wrapped dumb component that needs those results.
In this React application, the providers/PostList provider uses Apollo to query the server, get data, and then pass it to the wrapped component components/PostList.
Add the PostList.js file with the following code under providers:
import React from 'react';
import { gql } from 'apollo-boost';
import { Query } from 'react-apollo';

export const GET_POSTS = gql`
  {
    posts {
      _id
      title
      content
    }
  }
`;

const withPosts = Component => props => {
  return (
    <Query query={GET_POSTS}>
      {({ loading, data }) => {
        return (
          <Component postsLoading={loading} posts={data && data.posts} {...props} />
        );
      }}
    </Query>
  );
};

export default withPosts;The withPosts provider uses the gql method from apollo-boost and a Query wrapper component from react-apollo.
Next, a constant GET_POSTS is created, and it references a GraphQL query that defines the data that the Express server application must return upon each GET request — an ID, a title, and a content.
Finally, a withPosts() functional React component is created and is then used as a decorator in the PostRoot container. Notice how withPosts() accepts a Component parameter and then returns another function. This function accepts the props parameter (it may receive props from the higher React components) and returns a react-apollo Query component, which passes an array of objects, data, and props into Component (PostRoot is the component to be wrapped by Query).
It should be clear by now that components/PostList receives the postsLoading and posts values through PostRoot. In its turn, PostRoot gets the data from the withPosts provider. The flow looks like this:
There’s one more thing to explain before we move further: what’s happening in Query? In the Query wrapper component, we need to interpolate a function, which looks like this:
{({ loading, data }) => {
    return (<Component postsLoading={loading} posts={data && data.posts} {...props} />);
}}This function accepts an object returned by GraphQL, and this object has two properties: loading and data. loading
is a boolean value, and data contains all the information that came from a GraphQL query. In this application, data
will contain an array of objects to be rendered by Component. Any other props that the rendering component may use should also be passed as {...props}.
Next, we create a layout component PostList.
Creating a dumb component for the Post List
To render a list of posts, just add components/PostList.js with the code below to your current project:
import React, { Component } from 'react';
import { Card, CardTitle, CardBody } from 'reactstrap';

export default class PostList extends Component {
  constructor(props) {
    super(props);

    this.showPosts = this.showPosts.bind(this);
  }

  showPosts() {
    const { posts, postsLoading } = this.props;

    if (!postsLoading && posts.length > 0) {
      return posts.map(post => {
        return (
          <Card key={post._id} body outline className="post-card">
            <CardTitle>{post.title}</CardTitle>
            <CardBody>{post.content}</CardBody>
          </Card>
        );
      });
    } else {
      return (
        <div>
          <h3>No posts available</h3>
          <p>Use the form on the right to create a new post.</p>
        </div>
      );
    }
  }

  render() {
    return (
      <div className="posts-container">
        {this.showPosts()}
      </div>
    );
  }
}As you can see, this is a typical React component. We use Reactstrap components Card, CardTitle, and CardBody to create a layout for each post. The showPosts() method first verifies if posts exist, and if they do, it returns a layout to be rendered. Otherwise, a default layout is returned.
The Post List part is created, but it doesn’t show anything. We’re going to create a mutation and a form to grab post data and send it to the server. And once the Express server responds, the list component will render new data.
Creating a React Form
To create anything in web applications, it is necessary to build HTML forms. Similarly to how you created the Post List part of the application, add another two files: providers/AddPost.js and components/PostForm.js.
The layout component, PostForm.js, will only render a form and submit it with a title and content, while the AddPost provider will use a GraphQL mutation to send the data to the backend.
Creating a Higher Order Component for a React form
AddPost is also an HOC just like providers/PostList, and it also uses a react-apollo wrapper component, although this time the necessary wrapper is Mutation, not Query. To create a GraphQL mutation, you also need the gql method from apollo-boost.
Here’s the entire code for AddPost:
import React from 'react';
import { gql } from 'apollo-boost';
import { Mutation } from 'react-apollo';

import { GET_POSTS } from './PostsList';

const ADD_POST = gql`
  mutation($title: String!, $content: String!) {
    addPost(title: $title, content: $content) {
      title
      content
    }
  }
`;

const withAddPost = Component => props => {
  return (
    <Mutation mutation={ADD_POST}>
      {addPost => {
        return (
          <Component addPost={({ title, content }) => addPost({
            variables: { title, content }, refetchQueries: [
              { query: GET_POSTS }
            ] })}
          />
        )
      }}
    </Mutation>
  );
};

export default withAddPost;Similar to the PostList HOC, you need to create a GraphQL mutation, which is ADD_POST. This mutation gets two values — title and content — and sends an addPost mutation query to the backend.
Now let’s take a look at the withAddPost() functional React component. It returns a Mutation wrapper component, which accepts the ADD_POST mutation to be able to send mutation queries.
Let’s also have a closer look at the Mutation contents:
{addPost => {
  return (
    <Component addPost={({ title, content }) => addPost({
      variables: { title, content }, refetchQueries: [
        { query: GET_POSTS }
      ] })}
    />
  )
}}The interpolated function inside Mutation accepts just one argument, the addPost mutation, and returns Component, PostForm in our application.
Also notice that Component gets an addPost prop function, which will be called in PostForm with two parameters — title and content, the form data you’ll submit.
Inside the component’s addPost() method, there’s a call to the addPost() mutation passed to the mutation function. You can see the following object:
{
  variables: { title, content },
  refetchQueries: [{ query: GET_POSTS }]
}The object with variables and refetchQueries properties is used by GraphQL to handle mutation queries.
First, we just pass the values that must be stored in the database into the variables property. Once those values are stored, we want the Express server to respond to the client with the created object. If you just send an addPost mutation query with title and content, you won’t see a new post shown in the list until you manually refresh the page. This is when refetchQueries is helpful.
refetchQueries is an array of query objects that we want to resend. And we want to resend only one query —GET_POSTS.
Finally, let’s create a form to get the title and content from the user.
Creating a PostForm component
Add the file PostForm.js with the following code into components:
import React, { Component } from 'react';

import { Form, FormGroup, Label, Input, Button } from 'reactstrap';
import { withAddPost } from '../providers';

@withAddPost
export default class PostForm extends Component {
  constructor(props) {
    super(props);
    this.submitForm = this.submitForm.bind(this);
  }

  submitForm(event) {
    event.preventDefault();

    this.props.addPost({
      title: event.target.title.value,
      content: event.target.content.value
    });
  }

  render() {
    return (
      <div className="post-form">
        <h2>Create new post</h2>
        <Form onSubmit={(event) => this.submitForm(event)}>
          <FormGroup>
            <Label for="postTitle">Post Title</Label>
            <Input type="text" name="title" id="postTitle" placeholder="Title" />
          </FormGroup>
          <FormGroup>
            <Label for="postContent">Post Content</Label>
            <Input type="textarea" name="content" id="postContent" placeholder="Content" />
          </FormGroup>
          <Button className="submit-button">Submit new post</Button>
        </Form>
      </div>
    )
  }
}PostForm is a typical React component. It has the submitForm() method to submit data using the addPost() method
(which it received as a prop from the AddPost provider component). The form layout is also typical: We use Reactstrap
components Form, FormGroup, Label, Input, and Button to create an HTML form with Bootstrap.
The React application is almost done. We suggest adding some styles and a script to run both the Express server and the React
client applications with one command.
Let’s recap what you’ve created so far:
- A modular React application
- An instance of Apollo Client to handle GraphQL in React
- A Post module consisting of Post List and Post Form
- Providers and components for each module part
- A mutation and query created with Apollo’s gql method
The Finishing Touches
You may want to run the React and Express applications simultaneously with just one command. That’s easy to achieve:
install the package called concurrently that will let you run two scripts at the same time.
Add concurrently to the development dependencies in your package.json:
yarn add concurrently --devNow, add another script to the package.json to run the client and server applications at the same time:
{
  "scripts": {
    "server": "nodemon ./server/server.js",
    "client": "webpack-dev-server --mode development --open",
    "dev": "concurrently \"yarn client\" \"yarn server\""
  }
}Your Apollo, React, and Express application is ready, and you can run it with the following command:
yarn devTo make the client application look better, add the following code to the client/src/modules/post/styles/styles.css file:
.container {
  margin-top: 25px;
  padding: 25px 15px;
  background-color: #f5f7f9;
}

.card-body {
  margin-bottom: 20px;
}

.post-card {
  width: 350px;
  margin: 7px auto;
  cursor: pointer;
  color: #880a8e;
  box-shadow: 1px 2px 3px rgba(136,10,142,0.3);
}

.post-form {
  padding: 25px 20px;
  border: 1px solid rgba(0,0,0,0.125);
  border-radius: 4px;
  box-shadow: 1px 2px 3px rgba(136,10,142,0.3);
}

.post-card:hover, .post-form:hover {
  box-shadow: 2px 3px 4px rgba(136,10,142,0.5);
}

.submit-button {
  background-color: #880a8e !important;
}The application should be rebuilt and rerun, and you can open the browser to run it. Add a post and see how it’s
rendered to the list:
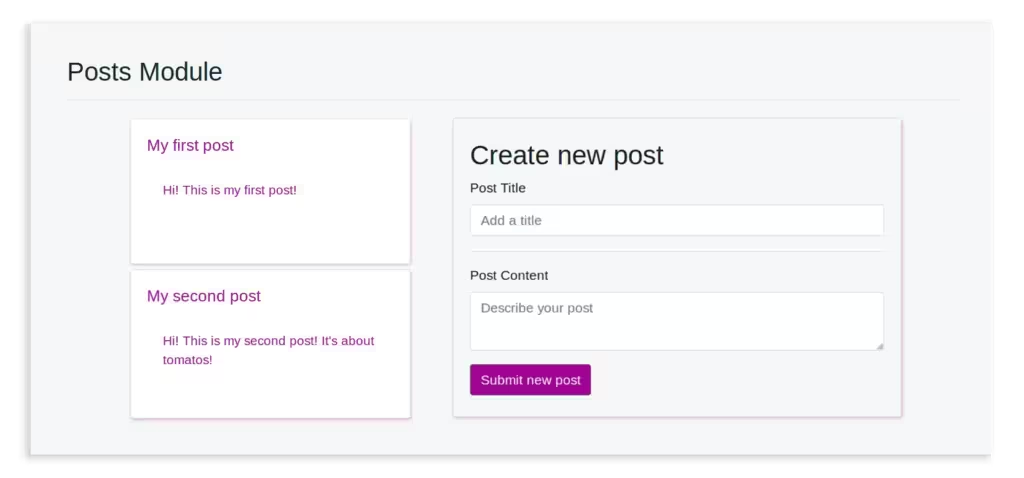
You reached the end of the tutorial and enlightenment. You have a basic React and Express application with a modular
structure. The React and Express apps can communicate using GraphQL with the help of Apollo packages. You can extend it further to build your custom product.


