
How do you configure Amazon Simple Email Service (SES) to not only send emails, but also to receive email statuses such as sent, delivered, or read? Amazon SES can only receive the status of emails it delivered, but it can’t send these statuses to your application. To track them, you need to use Amazon Simple Notification Service (SNS).
Configuring Amazon SES and SNS so they work together is quite a challenge, especially if you do this for the first time. We explain in detail how you can couple these Amazon services with a Scala application using the Amazon SDK. However, the general principle of configuring Amazon SES and SNS equally applies to applications built with other technologies.
Overview of How to Connect Amazon SES and SNS
Before diving into Amazon SES and SNS configurations, let’s first take a look at the diagram that demonstrates the flow of notifications between your application and these two Amazon services:
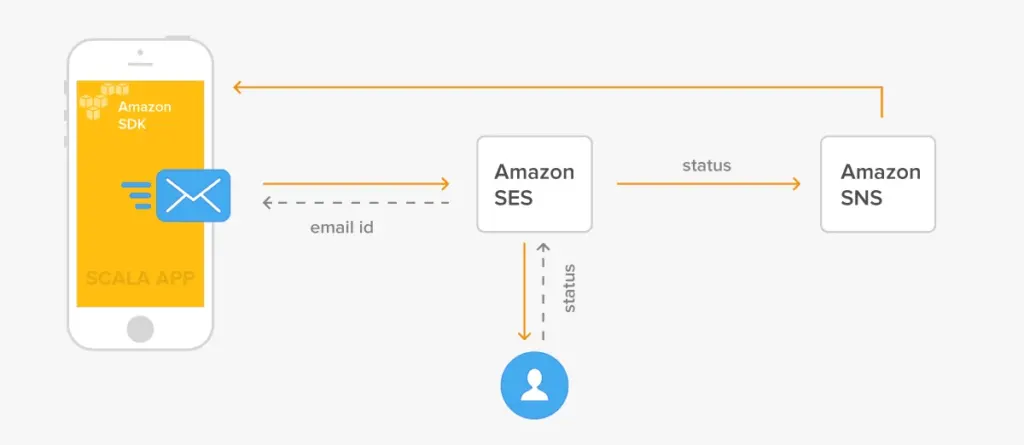
Let’s dig deeper into the notification flow.
First, your application sends an email using Amazon SES and saves the email ID sent back from Amazon SES. The application will use the Amazon SDK to send emails and receive the email ID.
Next, Amazon SES dispatches emails to the users. When the email status changes from sent to delivered, read, rejected, or any other status, SES will automatically notify Amazon SNS about the updated status via a topic.
Finally, the SNS topic will send a new email status to the endpoints that were registered with the topic. One of the endpoints will be your Scala application. In your application, you’ll need to compare the IDs — the stored email ID received from SES with the ID sent by SNS. If the IDs match, then your application will need to update the email status in the database.
That’s how you’ll be able to track the email status.
Having looked at the notification flow, we can now focus on the actual steps you need to complete to make Amazon SES and SNS work together:
- Add the Amazon SDK dependency to your Scala project.
- Validate the sender email (your email or the company’s email) with Amazon SES.
- Create a new SMTP user to get credentials for the Amazon SDK.
- Save the credentials on the server where your Scala application runs.
- Create a new topic in Amazon SNS and register your endpoints with the topic.
- Create a new configuration set for SES to connect to the SNS topic.
- Create a Scala service to handle emailing with SES.
Remember that you also need to save the emails’ IDs in your database and compare the IDs. How you implement this functionality is up to you, as we’ll be focusing on configuring Amazon SES and SNS.
We can now start with the first step.
Connect Your Scala Application to Amazon SDK
Connecting the Amazon SDK to a Scala application is easy. You just need to add the following line to the build.sbt file in your Scala project:
libraryDependencies += "com.amazonaws"%"aws-java-sdk"$"1.11.373"(At the time of writing this article, we used version 1.11.373 of the Amazon SDK. You can use any later version of the SDK in your project.)
After you added the AWS dependency to your project, you can start the next step — verification of the email address (your email or the official email of the company) with Amazon SES, which will be used in the field From in emails.
Verify an Email Address with Amazon SES
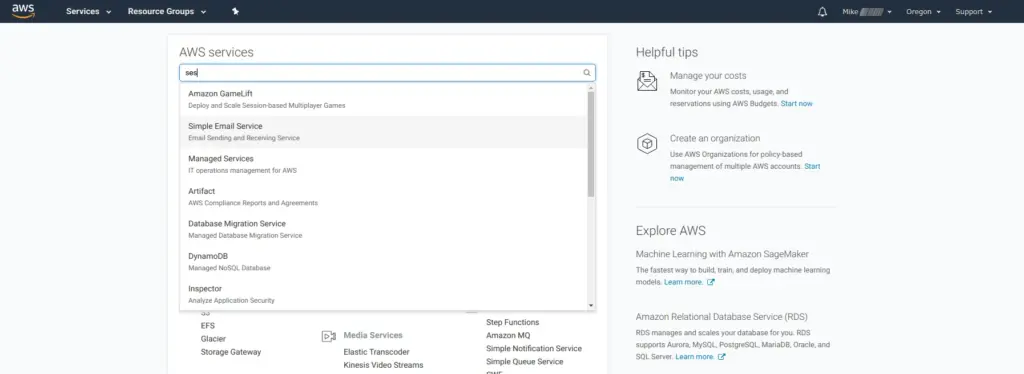
To verify an email with Amazon SES, you need to open the AWS Console and then follow to Simple Email Service:
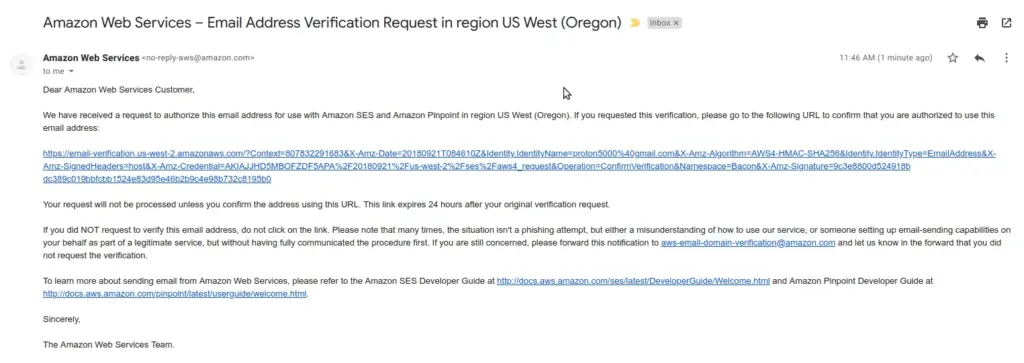
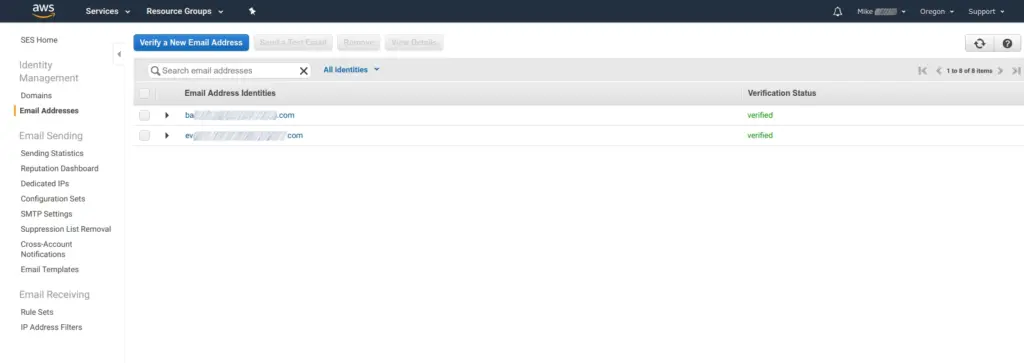
You can add a new email address that will be used for verification in the Email Address tab. Follow to Email Address and click Verify a New Email Address. Needless to say that you should use a real email address as Amazon will send a verification email as shown in the screenshot below:
Follow the verification link to confirm your email, and then you can view your verified email in the list of emails in the Simple Email Service tab:
After your email is verified, you can proceed to create a new SMTP user.
Create Amazon SES Credentials and an SMTP User
You need to add the credentials — a login and a password — to your application to be able to connect to the SMTP server and send emails with Amazon SES.
To create an SMTP user, open the SES dashboard via the AWS Console. In the dashboard, you need to select SMTP Settings and then click Create My SMTP Credentials. You’ll see the following page:
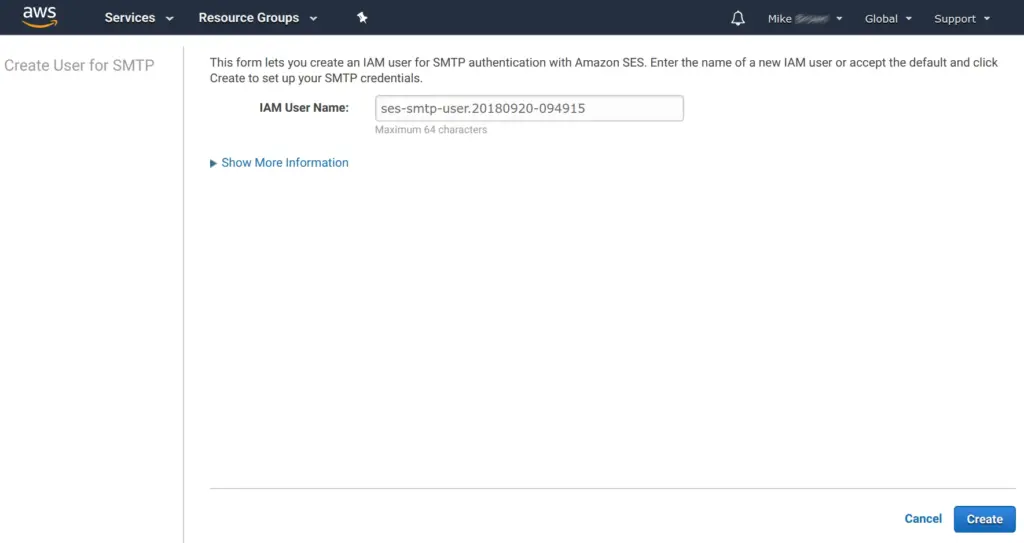
The system will automatically generate a name for your SMTP user, but you can enter any name you want (make sure that the name doesn’t include “Amazon”, though).
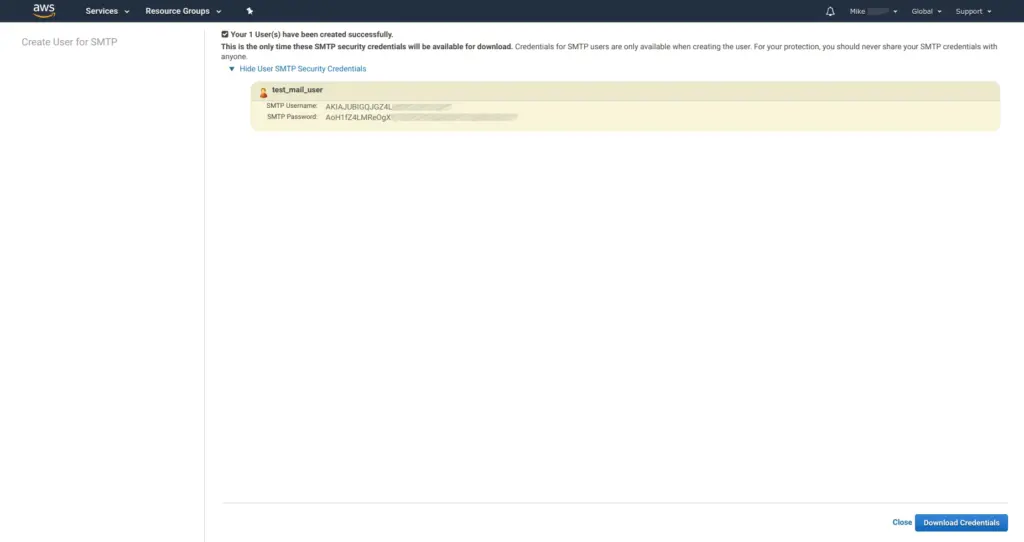
Once you click Create, the console will give you a new login and password for the username you provided. You can click Download Credentials to download a CSV file with your SMTP Username and SMTP Password.
Don’t leave the page unless you saved the login and password in a separate document. You won’t be able to view these details again, and you’ll have to create a new SMTP user if you didn’t save them.
Once you have the credentials, you need to save them on the server or development computer where you run your Scala application.
First, create the .aws/ directory under the home directory of your user. For example, if you’re John Doe using Ubuntu, then you need to create /home/johndoe/.aws. Next, create a text file named credentials (without an extension) under the .aws directory and save your login and password for the SMTP user in the format below:
| 1 2 3 | [default] aws_access_key_id=inmjnlhjOI8U9HKJnKL;lkhjgkljaiioijlasdfa332f aws_secret_access_key=Kklun897zux2nj3;llkap890sx9uvz;aq;werff3f |
The initial setup of Amazon SES is complete, and you can start configuring Amazon Simple Notification Service.
Create a Topic in Amazon SNS
As we discussed in the overview section, Amazon SES requires a topic to which it will notify about new email statuses. The topic will contain a list of the API endpoints to receive the statuses.
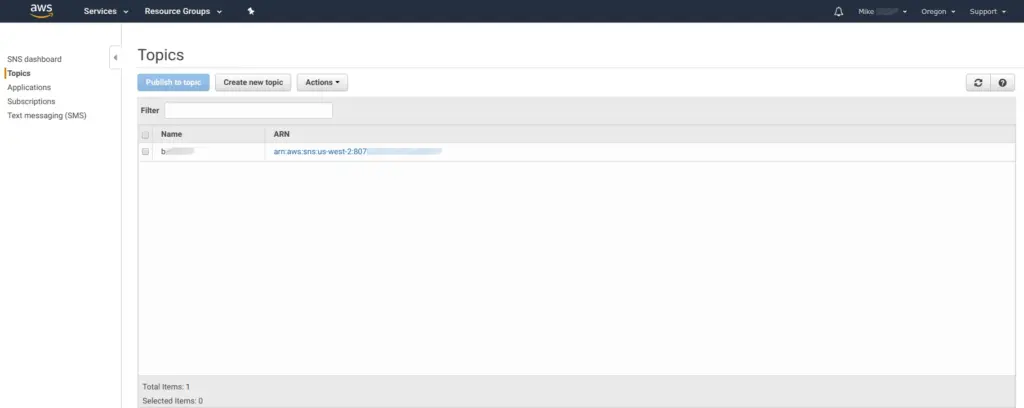
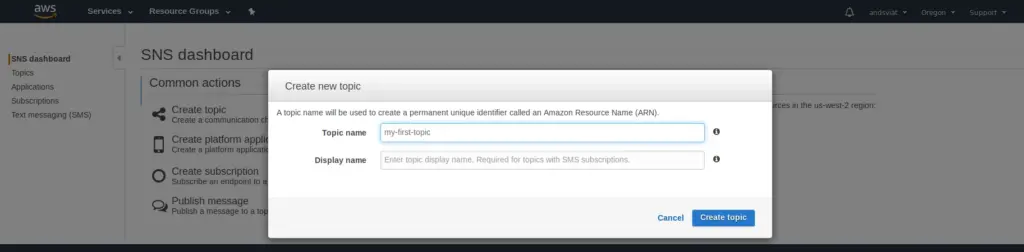
To create a topic, select Simple Notification Service in the AWS Console and open the Topics tab. In Topics, click Create new topic:
In the new window, you can enter any title for your topic for Title and, optionally, a short description for Display Name. Afterwards, click Create topic to add your topic:
After creating a topic, you need to register your endpoints with the topic.
Add an Endpoint to the SNS Topic
Before your application is able to get any notifications from the topic you’ve created, it’s necessary to add at least one endpoint to which the notifications must be sent by SNS. Adding an endpoint in Amazon terms is called creating a subscription.
Open the Simple Notification Service dashboard, click Topics, select the topic you’ve created in the previous step, and then click Create Subscription. You’ll see a popup window with your Topic ARN, protocol, and endpoint fields:
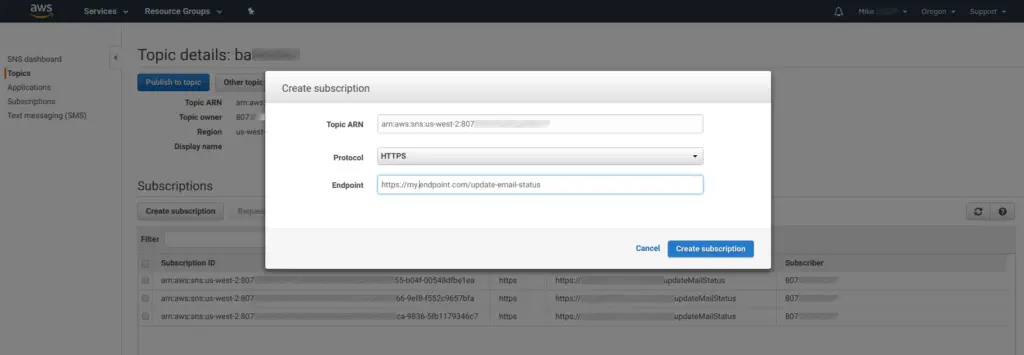
In this window, specify the protocol (HTTP or HTTPS as used by your application) and also the endpoint, for example, a URL https://my-website.com/ask-me-here, to which Amazon SNS will connect. Remember to also create a handler for the endpoint in your Scala application. You can create a very simple handler for now, as it’s enough to just log the confirmation message from Amazon SNS into the console.
Once you’ve created a handler and registered an endpoint, click Create Subscription. You’ll see the endpoint in the list:
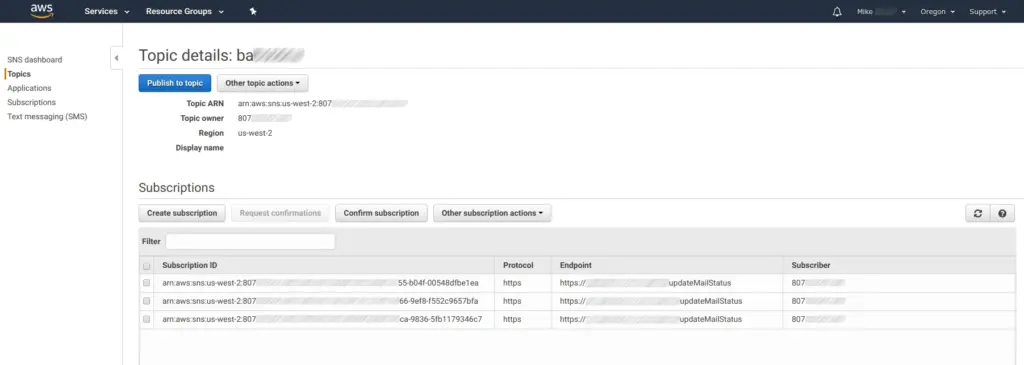
After you’ve added an endpoint, Amazon SNS will send a confirmation message to the endpoint you specified. If you didn’t receive the SubscriptionConfirmation message from Amazon SNS (in other words, you forgot to add a handler before sending a confirmation), you can repeat the confirmation request. For that, check the box for the endpoint in the list and then click Request confirmations (the button is always active for the subscriptions that you didn’t confirm).
Below, you can view the headers that are sent with the confirmation message:
POST / HTTP/1.1
x-amz-sns-message-type: SubscriptionConfirmation
x-amz-sns-message-id: 165545c9-2a5c-472c-8df2-7ff2be2b3b1b
x-amz-sns-topic-arn: arn:aws:sns:us-west-2:123456789012:MyTopic
Content-Length: 1336
Content-Type: text/plain; charset=UTF-8
Host: myhost.example.com
Connection: Keep-Alive
User-Agent: Amazon Simple Notification Service AgentHere’s the actual response in JSON:
{
  "Type" : "SubscriptionConfirmation",
  "MessageId" : "92c923144-2a5c-472c-8df2-7ff2be3d3r4c",
  "Token" : "233641p0o9kaveqadlskhfiuyho87yavcxk98z8787tzu0ij232n3j02jl2",
  "TopicArn" : "arn:aws:sns:us-west-2:123456789012:MyTopic",
  "Message" : "You have chosen to subscribe to the topic arn:aws:sns:us-west-2:123456789012:MyTopic.\nTo confirm the subscription, visit the SubscribeURL included in this message.",
  "SubscribeURL" : "https://sns.us-west-2.amazonaws.com/?Action=ConfirmSubscription&TopicArn=arn:aws:sns:us-west-2:123456789012:MyTopic&Token=233641p0o9kaveqadlskhfiuyho87yavcxk98z8787tzu0ij232n3j02jl2",
  "Timestamp" : "2012-04-26T20:45:04.751Z",
  "SignatureVersion" : "1",
  "Signature" : "EXAMPLEpH+kljhals9iJLIKx343tLhLKVNaewh432OfAJlkqjwe90hfa+gLPoBc1Q=",
  "SigningCertURL" : "https://sns.us-west-2.amazonaws.com/SimpleNotificationService-f3ecfb7224c72339f96de52f.pem"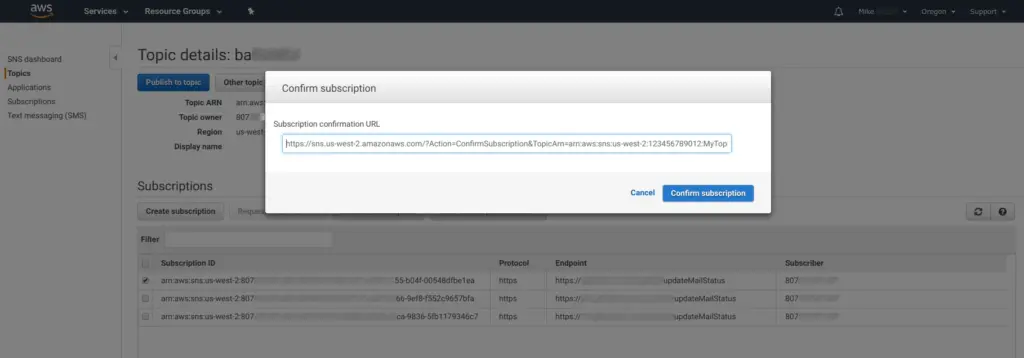
}You’ll need to open the link that’s stored in the property SubscribeURL in your browser to confirm the subscription. Since you only need to confirm the subscription once, there’s no need to parse this message or add other complicated logic. You can just manually copy the link and paste it into the address bar of your browser.
Alternatively, you can enter the subscription URL into the confirmation form. You can open this confirmation form in the Topics tab. Click the Confirm Subscription button that’s shown above the list of subscriptions:
After you follow the link, Amazon will open the following page:
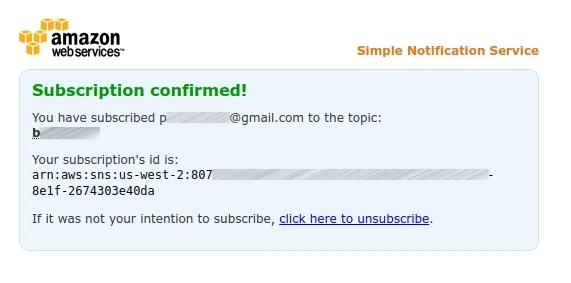
Simple Notification Service is ready to send notifications once the subscription is confirmed. In the following section, you’ll be testing the topic you’ve created.
Test the Connection to Amazon SNS Topic
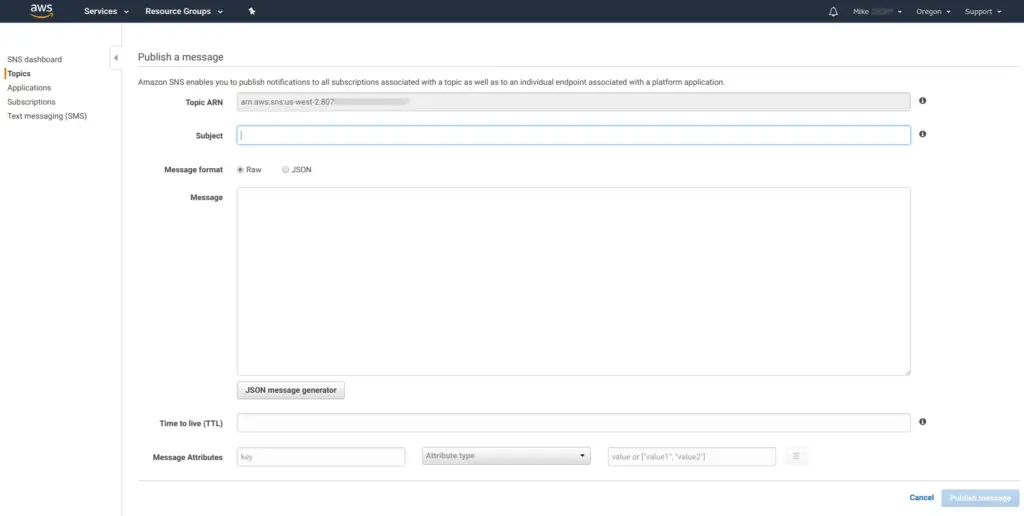
You can test the connection to Amazon SNS in a simple way. First, you should rework the controller for the endpoint you provided for the topic. This controller will get messages from Amazon SNS with the email ID and status.
To test how your updated controller works, send a message to it. Open the tab Topics in Amazon SNS and click Publish a topic. In the popup window, you can enter a new test message and send it. The message will be delivered simultaneously to all the endpoints that you’ve registered with the topic:
Here’s an example of a real notification that your endpoint will receive from Amazon SNS once SES gets a new email status:
{
  "eventType": "Delivery",
  "mail": {
    "timestamp": "2018-09-06T16:29:36.265Z",
    "source": "My App <my_app@superapps.com>",
    "sourceArn": "arn:aws:ses:us-west-2:802387597279:identity/my_app@superapps.com",
    "sendingAccountId": "802387597279",
    "messageId": "01010165afb7b289-cce5267d-0718-e88g-9265-21574d41b42b-000000",
  }
}This message in the JSON format will contain a unique message ID and also the event type with the current status of the email. The ID will be identical to the ID of the email that you saved in the database.
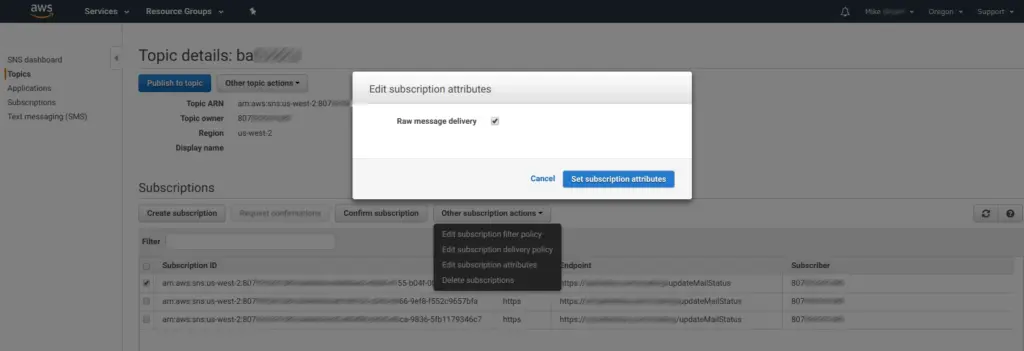
You can try out a different format for messages from Amazon SNS. For that, you need to check the box for the subscription you’ve created, and then click Other Subscription Actions to open the list of options. Next, select Edit subscription attributes from the list. Finally, check the box Raw message delivery and confirm changes by clicking Set subscription attributes.
Add a New Configuration Set in Amazon SES
As you’ve added and tested a topic in Amazon SNS, it’s necessary to create a new configuration set with that topic in the SES dashboard. Using a configuration set, you’ll be able to determine what information about the emails SES will be sending to the topic.
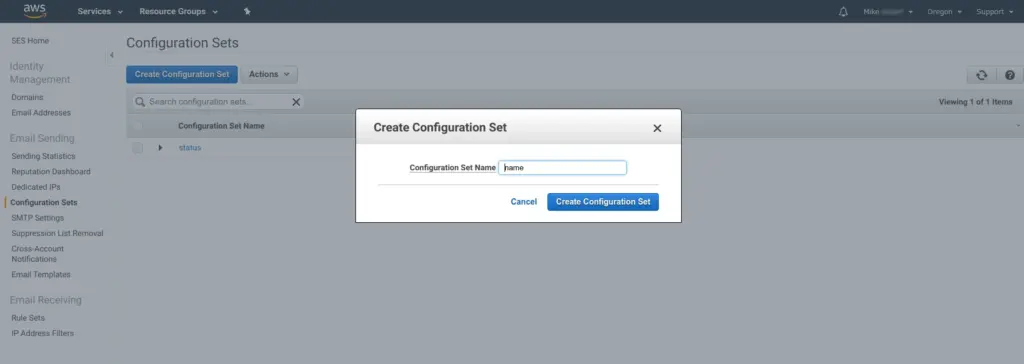
Let’s add a configuration set. First, open the Configuration Sets tab in the Simple Email Service dashboard. In the screenshot below, you can see a list of configuration sets with only one entry named status. To create your own configuration set, click Create Configuration Set. You’ll see a popup, where you can add a name for the set. After that, click on the Create Configuration Set button in the popup.
Once the configuration set is added, you’ll see it in the list. Just creating a configuration set isn’t enough, though, for connecting Amazon SES and SNS.
You need to click on the name of the configuration set to open the Edit Configuration Set tab with configurations. Then, click Select a destination type. Finally, select SNS from the list:
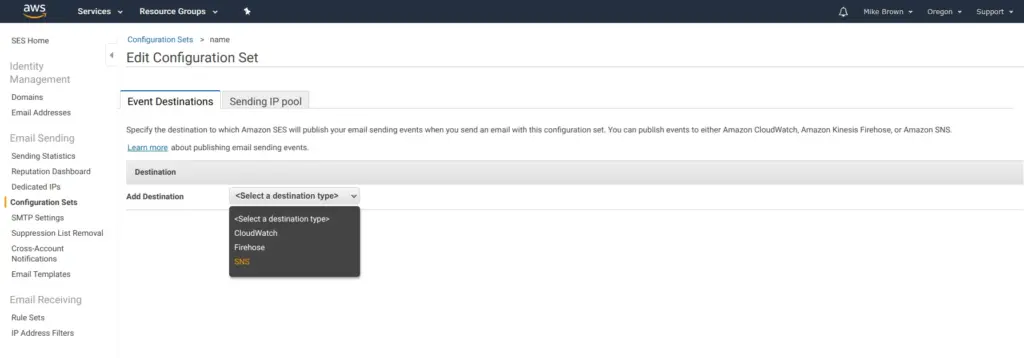
A window with SNS Destination configurations will appear. In this window, you need to check the boxes for the types of events (in this case, email statuses) that will be sent from SES to the SNS topic. Also, select the topic you’ve created from the list (the topic is automatically added to the list):

You’ve finished configuring Amazon SES and SNS. Next, you need to create a service in your Scala application to send emails.
Create a Scala Service to Send Emails
It’s time to create a service in your Scala application to send emails. The service uses Amazon SDK classes and methods to create and send emails. You can view the Java implementation in the Amazon SES documentation.
Our service for sending emails is written in Scala, and it’s just a method sendMessage():
def sendMessage(): Try[String] = Try {
    /**
     * Email information.
     */
    val DEFAULT_SENDER_EMAIL = "sender@example.com"
    val DEFAULT_BODY = "Hello! This is the test message."
    val DEFAULT_SUBJECT = "subject"
    val DEFAULT_RECIPIENT = "recipient@example.com"
    val DEFAULT_FILE_PATH = "/home/user/data.xlsx"

    /**
     * Name of the configuration set created in Amazon SES for Amazon SNS.
     */
    val DEFAULT_SET_NAME = "my_configuration_set_name_from_ses"

    val session = Session.getDefaultInstance(new Properties())

    /**
     * The Amazon SES client that will send emails. Set the region to your region.
     */
    val client = AmazonSimpleEmailServiceClientBuilder.standard()
                        .withRegion(Regions.US_WEST_2)
                        .build()

    /**
     * Setting up email messages.
     */
    val message = new MimeMessage(session)

    message.setSubject(DEFAULT_SUBJECT, "UTF-8")
    message.setFrom(new InternetAddress(DEFAULT_SENDER_EMAIL))
    message.setRecipients(
        javax.mail.Message.RecipientType.TO,
        InternetAddress.parse(DEFAULT_RECIPIENT)
            .asInstanceOf[Array[Address]]
    )

    val msg_body = new MimeMultipart("alternative")
    val wrap = new MimeBodyPart()
    val html = new MimeBodyPart()

    wrap.setContent(msg_body)

    val content = new MimeMultipart("related")

    message.setContent(content)
    content.addBodyPart(wrap)

    /**
     * Optional code that allows you to add a file to emails.
     */
    val msg = new MimeMultipart("mixed")
    message.setContent(msg)
    msg.addBodyPart(wrap)
    val att = new MimeBodyPart
    val fds = new FileDataSource(DEFAULT_FILE_PATH)
    att.setDataHandler(new DataHandler(fds))
    att.setFileName(fds.getName)
    msg.addBodyPart(att)

    val body = DEFAULT_BODY
    html.setContent(body, "text/html")
    val baos = new ByteArrayOutputStream()

    try {
        message.writeTo(baos)
        val rawMessage = new RawMessage(ByteBuffer.wrap(baos.toByteArray))
        val request = new SendRawEmailRequest(rawMessage)
                                .withConfigurationSetName(DEFAULT_SET_NAME)
        val result = client.sendRawEmail(request)
        result.getMessageId
    } finally baos.close()
}Let’s break this long code example into meaningful chunks and review them.
Create Constants for Email Data
First, you need to initialize several constants for the emails. At the very least, you need to set the sender, body, subject, and receiver. Additionally, you can set a path to a file that you’ll send with emails. If you don’t need to attach files to emails, you may delete the DEFAULT_FILE_PATH constant.
val DEFAULT_SENDER_EMAIL = "sender@example.com"
val DEFAULT_BODY = "Hello! This is the test message."
val DEFAULT_SUBJECT = "subject"
val DEFAULT_RECIPIENT = "reciepient@example.com"
val DEFAULT_FILE_PATH = "/home/user/data.xlsx"Set the Configuration Set
Remember the configuration set you created in the Add a New Configuration Set in Amazon SES section? Add the name of the created set to your application:
val DEFAULT_SET_NAME = "my_configuration_set_name_from_ses"Add a Session
You also need to create a session for sending emails, as required by the Amazon SDK. The session will be used as a parameter when instantiating a new message (an email).
val session = Session.getDefaultInstance(new Properties())Create an Amazon SES Client
The code below will create an instance of Amazon SES Client. Remember to specify the region in which your SMTP server is located.
val client = AmazonSimpleEmailServiceClientBuilder.standard()
                    .withRegion(Regions.US_WEST_2)
.build()You can find your region in the AWS Console. In the SES dashboard, open SMTP Settings and find Server Name. The server name for your application will look similar to this: email-smtp.us-west-2.amazonaws.com. You need to use the middle part — us-west-2 — in your application, as shown in the example (note that in the application code the region is written in capital letters, and that dashes are replaced with underscores).
Amazon provides more information about the regions in a dedicated document in their developer guide.
Create an Email
Next, you need to create an email object. This object will use the subject, receiver, sender, and email body you’ve created in the section Create Constants for Email Data. The various classes in the example below are provided by the Amazon SDK. You can find more information about these classes in the Amazon SDK developer guide:
val message = new MimeMessage(session)

message.setSubject(DEFAULT_SUBJECT, "UTF-8")
message.setFrom(new InternetAddress(DEFAULT_SENDER_EMAIL))
message.setRecipients(javax.mail.Message.RecipientType.TO,
InternetAddress.parse(DEFAULT_RECIPIENT).asInstanceOf[Array[Address]])

// Create a multipart "alternative" child container.
val msg_body = new MimeMultipart("alternative")

// Create a wrapper for the HTML part.
val wrap = new MimeBodyPart()

// Define the HTML part.
val html = new MimeBodyPart()
msg_body.addBodyPart(html)
wrap.setContent(msg_body)

/** The part MimeMultipart("related") indicates that various subparts are
 * all parts of the root. For example, the main part is  text/html, and
 * the subparts are embedded images.
 */
val content = new MimeMultipart("related")
message.setContent(content)
content.addBodyPart(wrap)

val body = DEFAULT_BODY
html.setContent(body, "text/html")
val baos = new ByteArrayOutputStream()Attach a File to Emails (Optional)
If you want to attach files to emails, use the following code:
val msg = new MimeMultipart("mixed")

message.setContent(msg)
msg.addBodyPart(wrap)

val att = new MimeBodyPart
val fds = new FileDataSource(DEFAULT_FILE_PATH)

att.setDataHandler(new DataHandler(fds))
att.setFileName(fds.getName)

msg.addBodyPart(att)Send an Email
After you’ve created and configured the email you’re going to send, add a try block that will send emails. Note the line result.getMessageId. When you call the sendMessage() method, it’ll return an email ID. Remember that you’ll need to save the ID manually in your code when you call this method.
try {
    message.writeTo(baos)
    val rawMessage = new RawMessage(ByteBuffer.wrap(baos.toByteArray))
    val request = new SendRawEmailRequest(rawMessage)
                          .withConfigurationSetName(DEFAULT_SET_NAME)
    val result = client.sendRawEmail(request)
    result.getMessageId
} finally baos.close()You’ve completed the setup of the service. Now Amazon SES and SNS can work together and let you track the email status with your Scala application. And you can learn even more details about SES and SNS in the Amazon developer guides.
Let’s also review one last aspect of sending emails with Amazon SES. You may also want to track if your emails are blocked by spam filters. For that, Amazon offers to use the SES Reputation Dashboard.
In the AWS Console, just open the Simple Email Service dashboard, and then click on Reputation Dashboard:
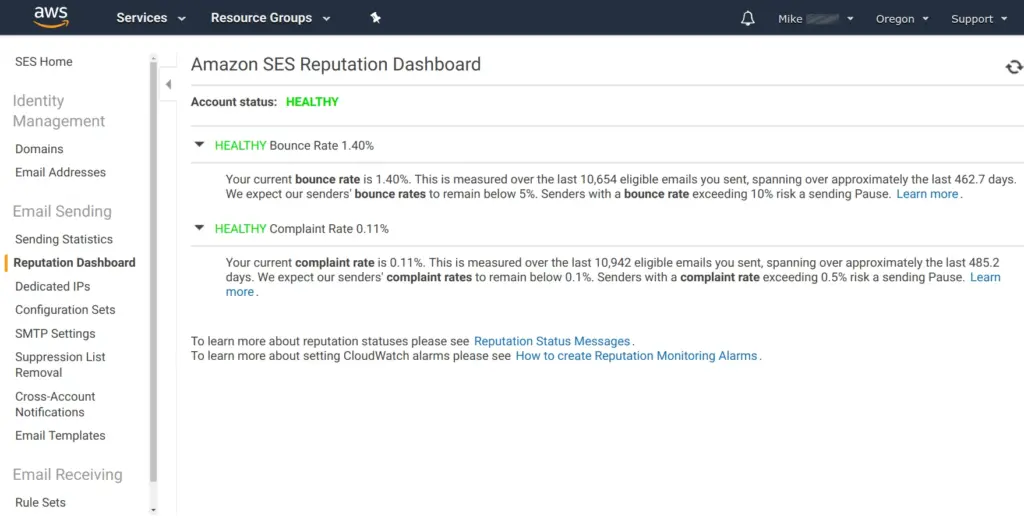
In the Reputation Dashboard, you can view such data as the bounce and complaint rates.
Now your Scala application can send emails using Amazon SES and track the status of sent emails with the help of Amazon SNS.


