

If you want to use HTTPS with your Scala application based on Play Framework 2.3 (or lower), then it’s not possible to just enable this secure protocol in the configuration file, which you can do with the more recent Play versions. But, given that using HTTPS in today’s web applications is inescapable, how would you configure a Play 2.3 project to use this secure protocol?
You can spend time upgrading and reworking the project to use a higher Play Framework version. However, if you lack time and desire to do that, you can still run your application with HTTPS if you do the following:
- Generate SSL keys and self-signed certificates using keytool;
- Configure HTTPS with Scala and Play Framework 2.3; and
- Redirect the users from HTTP to HTTPS in your application.
We explain step by step how you can run a Scala application on HTTPS. Note, however, that we provide a solution that you can only use for development; if you decide to run a production application over HTTPS, you’ll need to register your SSL key with a trusted Certificate Authority (CA) to get signed and approved certificates.
Before we move further, let’s also review the main terms related to HTTPS.
HTTPS and Related Terms
To use HTTPS, a secure protocol, you need an SSL certificate and two SSL keys, which are all registered in a keystore on your computer. But what are they exactly?
SSL Certificate
An SSL certificate is just a file that contains a unique cryptographic key — an SSL key (which we discuss further) — connected to your organization and also metadata about your company (its name, email, and other data).
Typically, you first create a self-signed certificate with a library such as keytool and use it for development and testing. Then, when you’re ready to deploy your application for production, you can send your public key to a Certificate Authority for validation and then use the registered, valid certificate.
SSL Public and Private Keys Pair
You’ll use two SSL keys. One key is called public and is sent to the users to be stored in their browser, encrypt their requests to the backend application, and validate your application as trusted.
The other SSL key is called private, and it can only be stored on the server where the application runs. Using these keys allows you to encrypt the information with one key and decrypt it only with the other key from the same key pair, thus ensuring that the user data looks gibberish to an attacker.
Keystore to Store SSL Keys and Certificates
A keystore (also called a key storage) is a file that contains a set of SSL keys used to authenticate HTTPS requests. This file also lets you manage the registered SSL certificates, and, therefore, keeping your keystore file in a secure place is vital for production applications.
Generating an SSL Certificate
We use the keytool library to generate and manage SSL keys on Ubuntu 18.04 (you can use keytool in Windows once you install the Java JDK).
Note again that the generated certificates and keys will only be suitable for development mode — the SSL certificates that you create with keytool are called self-signed, and they’re not considered trusted by the browsers. You have to contact a Certificate Authority to verify and sign the public key to be used for production. A CA just signs your certificates, thus making sure that they’re authentic. When you get the signed certificates from a CA, you just need to register them in the keystore (we explain how you can do this in a later section) and run the application by specifying the updated keystore.
Creating a Keystore
Generating a keystore is done using the following command:
keytool -keysize 2048 -genkeypair -alias tomcat -keypass 7fL8&8dcEB -keyalg RSA -keystore tomcat.keystoreLet’s clarify what the parameters mean:
-keysize 2048sets the keystore size in bytes. The larger the storage, the more difficult it’ll be to decipher an SSL key. Setting the keystore size to 2048 bytes is sufficient for high-level security.-genkeypairgenerates a public key and an associated private key.-alias tomcatsets the alias for the SSL key; you’ll use this alias to reference the keystore later, when configuring the application.-keypass 7fL8&8dcEBsets the keystore password to7fL8&8dcEB. Memorize this password as you’ll need it later to generate an SSL key.-keyalg RSAsets the encryption type for storage, which is RSA.-keystore tomcat.keystore, sets the name for the file into which the generated key will be written
When you run this command, we can give one recommendation — resist the temptation to use 123456 or qwerty for the password even for testing purposes.
Next, you’ll “fill in a questionnaire”. The data you’ll provide will be stored in the SSL key:
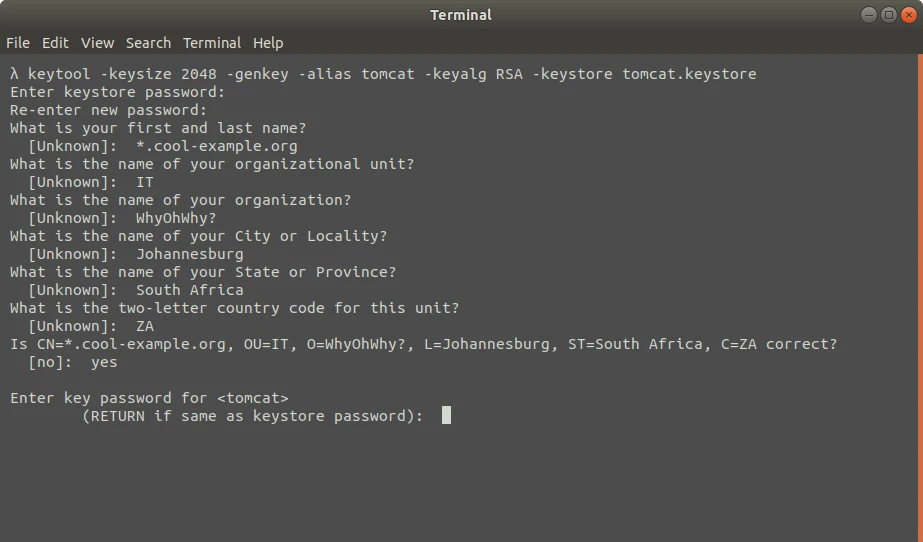
- What is your first and last name?
You need to enter a fully qualified domain name (FQDN), a host name, or a URL. There’s no need to enter your real name, though.
If you’re creating a wildcard certificate that can be used with subdomains, also, add an asterisk * in the left part of the name. For example, using the strings *.coolexample.com or www*.coolexample.com. You’ll be able to protect all the subdomains with the same certificate.
- What is the name of your organizational unit?
This is an optional field. Use it if your company’s departments have their own SSL keys. For instance, you can enter IT.
- What is the name of your organization?
Enter the name of your organization. Note that the organization you provided must be the owner of the domain name that you specified previously. And if you’re registering as an individual, provide your name.
- What is the name of your City or Locality?
Provide the full name of the city where your organization is located or registered.
- What is the name of your State or Province?
Provide the full name of the state or province where your organization is located.
- What is the two-letter country code for this unit?
You need to provide a two-letter code for the country where the organization is located. Enter UA for Ukraine, ZA for South Africa, IE for Ireland, or similar. You can consult the table of ISO alpha-2 codes for your country.
Once you have answered all the questions, the terminal will ask you to confirm that the data is correct. Just enter yes (provided you’re satisfied with what you entered).
Finally, you’ll need to enter a password for the yet-to-be-created SSL key:
Enter key password for <tomcat>
(RETURN if same as keystore password):You can create a password for that key, but you don’t have to. You should enter a different password if you need to store several keys in the same keystore or if you’re using the keys and keystore for a production application. Otherwise, just press Enter, and keytool will use the same password for the keystore and for the key. You can just ignore the warning message (below) that pops up after you press Enter:

Creating an SSL Key
Now that your keystore is created, you can generate a public SSL key. Recall the keystore password and run the following command (the terminal will ask you to provide the correct password):
keytool -certreq -alias tomcat -file csr.txt -keystore tomcat.keystoreThe command above uses the following parameters:
-certreqgenerates a public SSL key (which also has a fancy name, Certificate Signing Request).-alias tomcatsets the alias to refer to the key.-file csr.txtcreates acsr.txtfile to store the key (this is different from the keystore).-keystore tomcat.keystoresets the key storage file.
The generated file with your SSL key will be located in the root home/johndoe folder (certainly, your real username will be used instead of johndoe) and will look similar to this:
-----BEGIN NEW CERTIFICATE REQUEST-----
MIIC7TCCAdUCAQAweDELMAkGA1UEBhMCemExFTATBgNVBAgTDFNvdXRoIEFmcmlj
YTEVMBMGA1UEBxMMSm9oYW5uZXNidXJnMRIwEAYDVQQKEwlXaHlPaFdoeT8xCzAJ
BgNVBAsTAklUMRowGAYDVQQDDBEqLmNvb2xleGFtcGxlLmNvbTCCASIwDQYJKoZI
hvcNAQEBBQADggEPADCCAQoCggEBAJzDSPaEZQ2bbBKPF4+FGDCHnvfqB55wTwSG
mpIe/W0aHB83vtB+vtkgjlVqblCrSbXONkEyRo7Pz03jwszIzv8R9tGddCQYpSF9
xDT9S3lhTVDj3FGlum+KxP5KmQJ81w9Of2+xewNhj43GDyKLjaM4rkxn4wI4who7
2VB0uwcu9nBTtkkw5EXDFUEakWSrmcWAuHmMuzG0i4F5BHWTtLMHCMkMG0LHtgiK
JSVAc12mg8blcHOhibr4Mj4u6xNsppdPmy8J6RDpDEjG8OGoBZeyXFx+I7pz/x3B
nHUPfgRN8YhTF++GI+YRlE3hOchPmwOsbo6aQ7/zYcgVs99u47kCAwEAAaAwMC4G
CSqGSIb3DQEJDjEhMB8wHQYDVR0OBBYEFEH84qOEP8flnr6oLJ5M0cB6xgYMMA0G
CSqGSIb3DQEBCwUAA4IBAQCakeGE9L3GoAbAa4dyXZzSrp1/vf8pW/TjuL2qHfeF
WRj3GwUY7LC0R5knmaiHSXoS6iq426kVEzlCHCG+ZfMPm2zCsxxQCqEqJ5rDm02C
7SgEN5pHspP6Nv/okzaotNI8bSK7FYqrrxZyL5cC/V2gvfXs/ZvHkFl9cTZrZAaI
EGF4RS9C5QIp9jlGgVIrF4amkO6eiFzlT7vHpuITzSYFkCXpHZHnbM2WzB+QxxLu
yi59RVeOxOYLIsxTGScht44qYDTYDLQfgRcupWBrzo13VLgbbv/CEsllT7xPnAjw
E7ubgE8e9V8vKuLQTSs3rZv5ZInck0NxKgFXsQJnBwvg
-----END NEW CERTIFICATE REQUEST-----Registering the SSL Key
You can skip this section if you’re going to only test the HTTPS connection. However, if you’re going to use the generated SSL key for production, you’ll need to send it to a Certificate Authority.
Just copy the SSL key that you can find in the home/johndoe/csr.txt file. Note that you must copy the entire contents of the file, including the delimiters -----BEGIN NEW CERTIFICATE REQUEST----- and -----END NEW CERTIFICATE REQUEST-----. Without the delimiters, your key won’t be valid.
Your SSL provider will give you two certificates in exchange for the key — the root and the intermediary certificates. (These certificates are also called primary and secondary, respectively.) You need to add them both to the keystore.
Use the following command to add the intermediary certificate to the keystore:
keytool -importcert -alias tomcat -keystore tomcat.keystore -trustcacerts -file <path_to_root_certificate>.<ext>-importcerttells thekeytoollibrary to import the certificates into storage.-alias secondarysets the alias for the intermediary certificate.-keystore tomcat.keystoresets the necessary keystore for the certificate.-file <path_to_intermediary_certificate>.<ext>sets the path to the file with the intermediary certificate.
Remember to replace the <path_to_secondary_certificate> with the actual path, and also use the proper file extension instead of <ext>.
The same way you can add the root certificate to your storage, although you need to use a slightly different command:
keytool -importcert -alias tomcat -keystore tomcat.keystore -trustcacerts -file <path_to_root_certificate>.<ext>Your keystore now stores all the necessary data to let you use HTTPS in your Play 2.3 application. The last step is to redirect requests coming from HTTP.
Redirecting HTTP Requests to HTTPS
Before you attempt to run your Play Framework application with HTTPS, you need to make sure that users, when visiting your website over an HTTP port, are still protected with HTTPS. And protecting the HTTP traffic is very simple.
Open the file Global.scala (which is located in the root folder of your Play 2.3 project) and override the onRouteRequest() method:
override def onRouteRequest(req: RequestHeader): Option[Handler] = {
  req.secure match {
    case false if Play.application.mode == Mode.Prod =>
      Some(Action{ MovedPermanently("https://" + req.host + req.uri )})
    case _ => super.onRouteRequest(req)
  }
}Our implementation of the onRouteRequest() method will filter all the client requests depending on the employed protocol (the req.secure property is a boolean value, and it returns true for HTTPS and false for HTTP).
If the req.secure is false in production mode, then the request came through HTTP, and we need to replace the protocol with HTTPS. As you can see, it’s enough to just change the https:// part to https: in the request string.
Notice that we don’t need to replace the request string in development mode. This is when the second part of the method is useful.
Using the SSL Keys
Just generating the SSL keys and overwriting the onRouteRequest() method isn’t enough to run your Scala application with HTTPS. You need to use the certificate when running the application. Run the command below and open your Scala application on https://:
./start -Dhttps.port=9443 -Dhttps.keyStore=<path_to_keystore> -Dhttps.keyStorePassword=<password_to_keystore>This is how your Play Framework-based Scala application can run with the secure HTTPS protocol.


